Showing posts with label fairies. Show all posts

Friday, 23 March 2018

Cradles and beds from toilet rolls

 I have been trying to think of how many ways I can use toilet rolls. So far I have made lanternsdolls house furniturea Christmas decoration, and a mobile. Today I have been playing around with toilet rolls and came up with these charming little beds and cradles for baby fairies (or any other little toys you may have).


The beds were made by cutting a toilet roll in half, and shaping the top of it as desired. Cut 1/2cm-1cm (approx) wide strips around the bottom, and fold inwards. This is because it is difficult to fold straight lines on a cylinder, so the strips need to be narrow enough to be able to fold easily in a cylinder shape.
Cut 2 circles of card slightly smaller than the toilet roll - glue one circle on the inside of the flaps, and glue one circle on the bottom of the toilet roll.  Press firmly into place until dry. I put something heavy inside it, to weigh it down while it dried.
Cover the bed with pretty paper. You may like to line the inside with felt, to make snug little bed.


The cradle was much easier and quicker to make than the beds. Simply cut a cradle shape out of the toilet roll, using its natural curve to shape it.
Cover it with pretty paper.
You might like to thread a ribbon through the top of it to hang it up.

Click on the link to see all my other craft posts

Saturday, 12 August 2017

Fairy Doors

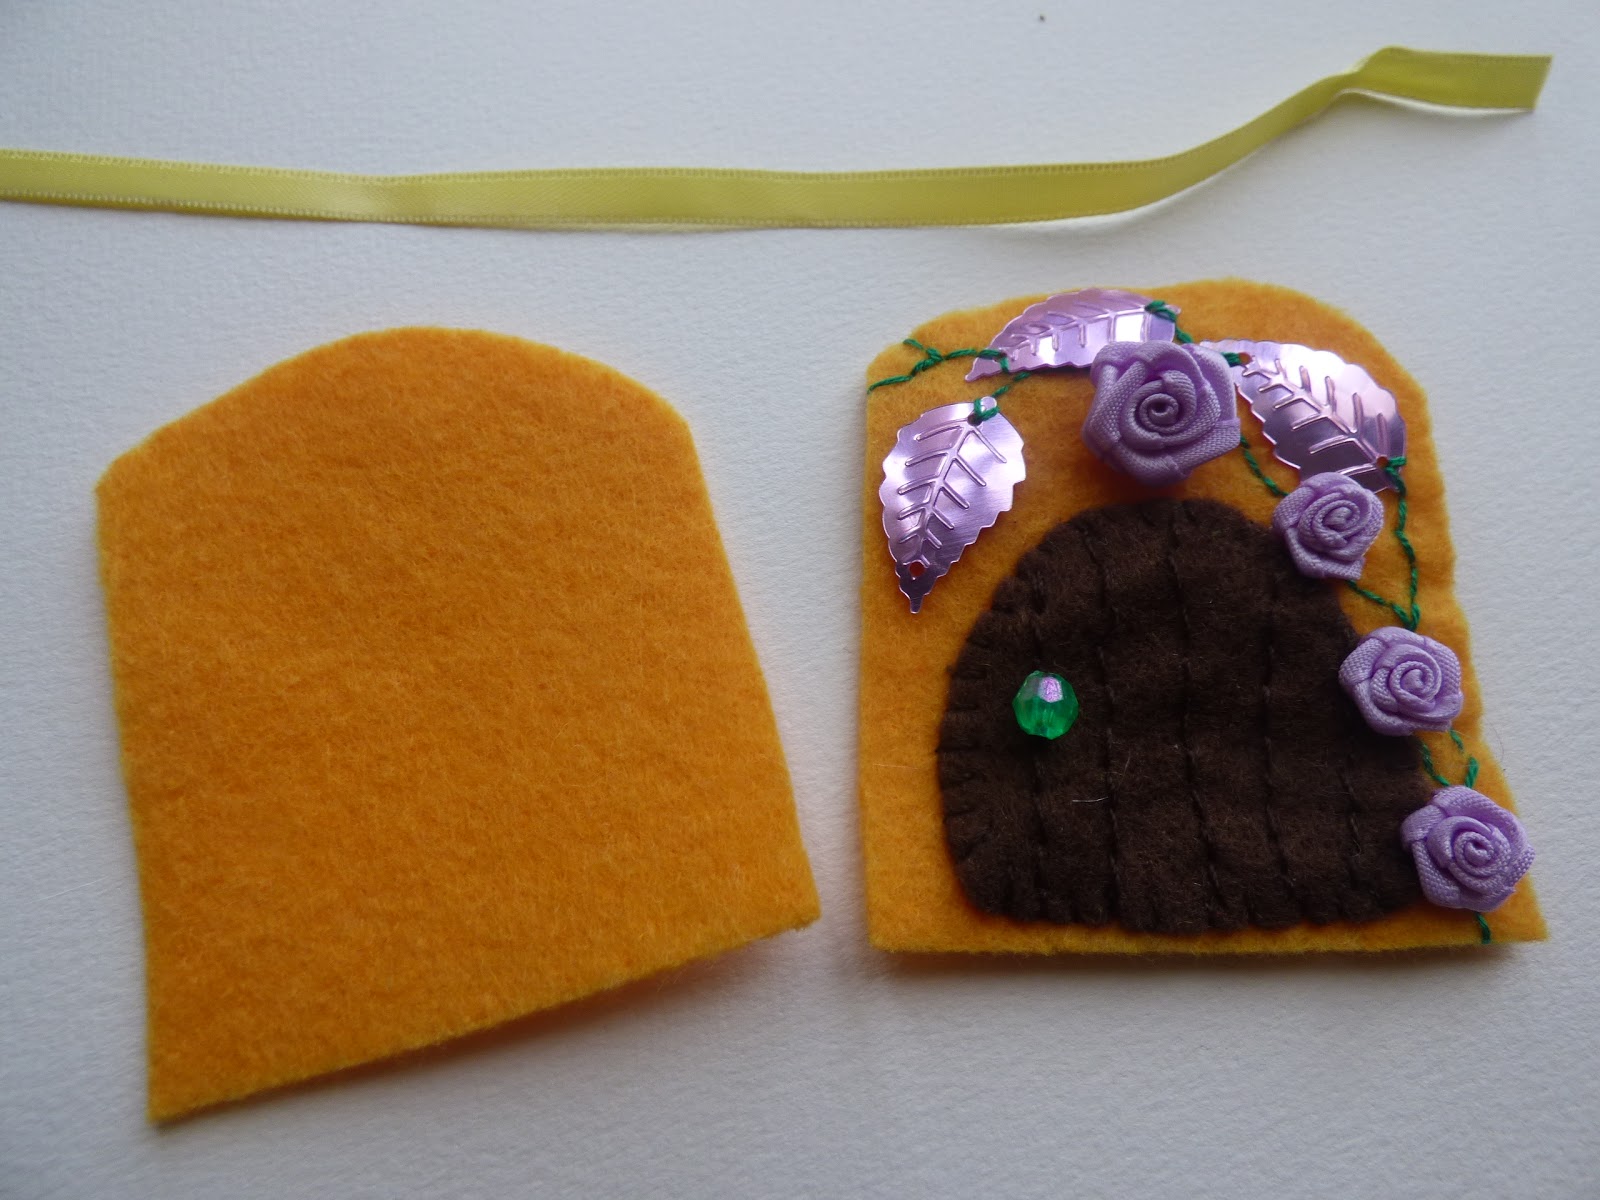
I admit it, I have been rather enchanted with fairy doors at the moment.  There are so many sweet fairy doors around at craft markets and on Facebook. But I like to make things myself, and I am not much of a woodworker. So I sat down and played around with some ideas and scrap felt. I wondered if it was possible to create a fairy door from felt. I soon found came up with an answer: yes it is! And I am secretly very pleased with the results and can't wait to make a whole lot more!

I drew various shapes for fairy doors and the background on paper, before cutting out of felt. It doesn't matter what shape you use - it can be uneven, round, or straight. You could even make a hobbit house shape. I just cut my felt shapes freehand, but if you like, you can make a template first. 


 If you want to create a panelled look on your fairy door, stitch lines on your door before sewing on a bead for the door handle.
 You will need to cut out one door, and two pieces of felt for the fairy house.
 You can use whatever you have on hand for embellishment... sequins, ribbon roses, flowers, beads....
 Position your door on one piece of the felt house, and sew into place.

I used two strands of green embroidery floss to embellish with. Stitch sequins and flowers firmly into place - I went over them a few times to make them secure.
If you want to be able to hang your fairy door, sandwich a loop of ribbon in between the two pieces of felt. Use blanket stitch around the edge of the house to sew the two pieces of felt together.


A Festive Fairy Door

I cut out two red shapes for the fairy house, and a white door. You can use whatever colour-way you wish - you could do a white house and a red door. 
If you want panelling on your door, stitch your lines using backstitch on your door first, before attaching it to the house.
I cut out a tree shape from green felt, and a trunk out of light brown felt. 
I folded a scrap of green felt in half to cut a circle, and then cut the middle out of it, to create the wreath. 
Lay your pieces out on one of your house pieces, and begin stitching. I added beads and sequins onto the tree and wreath as I stitched, and a bead for the doorknob. Stitch each bead and sequin through twice, to ensure they are securely fastened.

When you have finished the top layer of the fairy house, position it on top of the second piece of the fairy house, and sandwich a loop of ribbon in between.

Blanket stitch around the edge, securing the ribbon firmly. 


Click on the link to see all my other craft tutorials.

Click here to see all my Christmas related tutorials

Friday, 9 June 2017

Matchbox Babies

I used to love matchbox babies as a child. It was always exciting to be given a special little treat, and to push open the box to see what was inside. I liked that he was snuggled up in a cosy little bed, and I loved anything little. So when I was looking at my craft matchboxes that I had picked up from the Dollar store, I thought Matchbox Babies!
The craft matchboxes are slightly smaller than real matchboxes, and a bit less sturdier. You can use either, or both. To decorate the matchboxes, you will need:
Matchboxes
Decorative paper
Ruler
Craft knife
Craft glue - PVA is perfect. 

Measure your matchboxes (both the outside cover and the inside tray) and transfer your measurements to your paper. Cut using a craft knife and ruler.
Fold the paper around your matchbox and make sharp creases along the folds. 
Apply glue to your paper. I used a bit of thick card to spread the glue evenly and thinly across the paper.
Wrap the paper around the matchbox.


Cut a piece of felt and glue down to the base of the matchbox inner tray.

Cut a square of felt for the blanket to keep your baby nice and cosy!


Wooden Peg People

There are lots of tutorials on making these wooden peg people, and I am constantly inspired by the gnomes created over on Wee Folk Art's blog. They are amazing - go and visit them and check out their gorgeous gnome houses and all the other wonderful things they make.
What is wonderful about these gnomes, is you use pre-made wooden bases, and with a few felt scraps, and a little bit of haberdashery, you can make each one unique and different. These gnomes above were made with plain felt, but I added a bit of glitter glue to embellish them when they were complete.
These gnomes represent the four seasons... Spring (blossoms); Summer (strawberries); Autumn; Winter. I used embroidery thread and sequins for Spring; embroidery thread for Summer; tiny leaves cut out of felt for Autumn; ribbon and embroidery thread for winter.
The backs of the four seasons
If you want to embellish your gnomes, do it all before sewing the felt onto the gnome.
Some people glue the felt onto the peg dolls, but I prefer to stitch. I don't like the feel of felt when it has been glued. 
I don't really measure my felt properly... I just lay the peg doll onto the felt to see how high to cut it, and roll it around the base to see how long to cut it. Then I use that piece of felt as a template for cutting out more bases. 

The cape is done pretty much the same way. I cut a small rectangle, making sure it fits around the neck of the peg doll. To shape it, I fold the felt in half lengthwise so that when I cut it into a cape, it is the same on both sides.
Embellish the body before sewing it onto the peg doll.

Stitch the body onto the peg doll starting from the bottom, and go up to the top.
When you reach the top, do a running stitching around the neck. 
Pull the thread tight, to gather in the felt around the neckline.
Secure the thread with a few stitches.
Pull the thread down through the inside of the felt to the bottom, and snip with scissors to hide the thread.
If you want to embellish the cape, do so before attaching to the peg doll. 
Place the cape on the peg doll, making sure that the the seam of the body is at the back. The cape will hide most of the stitching.  
Secure the front of the cape with a few stitches.
For the hat, cut a triangle to fit around the head, and sew two sides together to create a cone. It took me a few goes to make a hat that fit. 
Glue the hat onto the head, making sure the seam on the hat lines up with the seam on the body at the back.

These gnomes are perfect for using in Small World Play, and you can adapt them to whatever scene you wish to create. I love setting up small world play areas and scenes to promote children's imagination, oral language, and collaborative play. Play is such a an important way that children learn. Imaginative play, dramatic or role play, and small world play, enables children to process their own ideas, their knowledge and experiences, and what they have seen and heard, to make sense of their world.

Click on the link for more of my teaching resources

Miniature Crockery


After having made a miniature delectable feast, as found in a previous post showing you how to make your own miniature felt food, I decided my gnomes needed some plates and cups. I looked around my craft room for ideas.

I found an empty chocolate box, and the inside was perfect for making plates and bowls. I cut around the outer circles at the base of the packaging for the plates. Simple, and super effective, not to mention affordable!

Plates and bowls cut from the packaging out of a chocolate box.

I also tried making plates by cutting circles out of a variety of plastic disposable plates, as well as lids. I prefer the chocolate box plates though! But looking at these circles of plastic gave me another idea... I love how ideas generate ideas. Often I start off not knowing where I am going to end up but I really enjoy the process.
I then wanted to make a cake stand. Again, I looked around my craft room to see what I had, and raided my stash of lids. I collect lids from toothpaste, dishwashing liquid, medicine bottles, bottle caps, etc, partly for transient art at school, loose parts, and also for possible crafts.

In my stash of lids, I found a lid. I think it came from a bottle of pills.
I gathered together a selection of plastic beads and buttons, to figure out how I was going to separate the layers for my cake stand.
I cut up a plastic plate into three circles, in graduating sizes. They do not have to be perfect circles.
I glued the large circle to the lid, and then began playing with beads and working out how to separate the layers. I found adding a button to the bead helped to raise it without making the centre post take up too much room, thereby leaving space for food.
When I was happy with it, I glued the middle layer on, and added another bead and button. 
Then I glued on the top plate. Voila! One cake stand.

Once I had finished making my stash of crockery, I began placing food on them... the cookies fit perfectly on the plates!


The dollar coin is there to give you an indication of size.