All my craft supplies are also in storage, however I discovered a wonderful little sewing shop which has a fantastic range of wool roving. I felt like a kid in a candy shop as I chose colour after colour, and couldn't wait to come home and start felting.
If you are new to needlefelting, check out my earlier tutorial on needlefelting here, which gives you a bit of information on how to needlefelt, and what you will need.
If you are new to needlefelting, check out my earlier tutorial on needlefelting here, which gives you a bit of information on how to needlefelt, and what you will need.
A while ago on Pinterest I came across thes amazing miniature felted scenes in walnut shells. I wasn't convinced I could do them, but mum and dad had walnut shells around their garden, so I thought I would give it a go, although on a less elaborate and less detailed scale.
I began by soaking the walnut shells in boiling water, then dried them out in the oven on low, to clean them. The walnut shells made the kitchen smell quite strongly, so I had to open windows and doors to air it out!
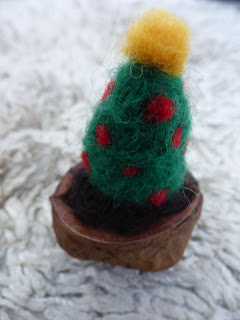
When the walnut shells had cooled down, I began. I rolled up a small length of wool roving and pressed it into the walnut shell for the base. I then pulled off a small length of green wool and rolled it up into a cylinder shape. I tried to make it conical but it was more cylindrical. However, this can be fixed once you begin felting, by felting firmly around the top to shrink it, and by adding more wool around the bottom to add shape. I started stabbing the wool in place, and once it was at a stage where it could start to hold its shape, I began to sculpt a more conical shape with my felting needle*. I then rolled up single strands of coloured roving between my thumb and forefinger to create tiny balls which I stabbed into place around the tree**.
The second tree I made, had to be able to stand up in a lopsided walnut shell, so I had to make sure that I had the angles right for it to be upright in an angled base. To decorate this tree, I wrapped a thin strand of yellow roving around and around the tree from the top to the base, and stabbed it into place with my felting needle.
The second tree I made, had to be able to stand up in a lopsided walnut shell, so I had to make sure that I had the angles right for it to be upright in an angled base. To decorate this tree, I wrapped a thin strand of yellow roving around and around the tree from the top to the base, and stabbed it into place with my felting needle.
When I was happy with my tree, I felted it thoroughly into the woolly base in the walnut shell, being careful not to damage the needle on the hard shell.
*When needle felting, the more you stab and felt the wool, the more your item begins to shrink and firms up. This is because the felting needle has barbs on it which grabs the natural hooks in the wool and brings the fibres together. The more you stab it with your needle, the more tightly the fibres mesh together. This is why there is always shrinkage when felting. Quite often when felting, I find that my finished product looks nothing like it did when I began, and it is easy to have a moment or two of doubt during the early stages about your project and a dreaded feeling that it is not working. Just keep going, keep stabbing, and have faith that it will turn out how you want it to. Felting needles are wonderful sculpting tools that can transform wool into whatever your imagination can dream up. You just need to persevere and have faith throughout the early formation period.
**If you want to add more wool to your item, make sure you add it while the fibres are still loose. I find that I am unable to attach wool to objects that have been felted too much; this is the case whether I am adding shapes such as arms; details such as hair and eyes; or extra roving for more shape and thickness. Keep fibres loosely felted where you will be adding to it. Once you have attached all your details, then you can begin stabbing your project firmly into shape.
To see more of my Christmas related crafts and tutorials, please click on the link here.
To see my other craft posts and tutorials, please click on this link here.
To see my other craft posts and tutorials, please click on this link here.


Cool
ReplyDelete