Monday 19 December 2016

Christmas Display!

At school I created Santa's Workshop in our display table.  I like to try and bring in a little bit of magic and wonder for the children, and I often see them sitting there looking at the elves, talking about it with their friends, or trying to find their names on Santa's Good List.

All the elves were made using my favourite book, Forest Fairy Crafts. Do visit the website and check out the book, it is amazing, the instructions are clear, patterns are included and teaches both adults and children how to make these wonderful little elves and Christmas fairies, as well as others such as leprechauns, angels, witches, wizards, mermaids, and flower fairies.
The 'Toy Maker', the 'Jewellery Maker', and the fixer of 'Broken Toys'.
Signs were written on a piece of white card and affixed to a small wooden block using blu-tac. I drew around the edge of each sign with a red marker pen.  I tried to find little things that might be used such as a tiny sewing set, a spool of cotton, some random beads, and a few little toys.
The tables are made using a small wooden block and held up with miniature wooden spools.
The Lists
Santa's Good List and Naughty List are up on the wall.  I used sheets of scrapbooking paper to decorate the walls.  
Every child on the class is on the good list... but not all of them have a tick next to them to show they have been checked twice!
On the Naughty List is: Donald; Hillary; The Big Bad Wolf; The Witch; Goldilocks; and Maui.

The Mailing Station
The Mailbox was made from an empty toothpaste box, cut to size, taped shut and covered in white paper. I used red and black marker pens to add the detail.  
I cut a slit at the bottom and pushed a small block through, which enables it to stand up.

I made tiny envelopes out of paper, and wrote tiny notes to Santa, saying things such as: 
"Dear Santa, can I please have a hors"
"For Christmas I want lollies"
"Dear Santa I would lik a Barbie."
"Dear Santa. Mummy says I've been naughty but I've been really really good.  I only pulled my sisters hair because she was mean to me.  I didn't say bad words, Jack said it first.  I didnt push my sister off her bike she just fell off all by herself. I made my bed today.  Mummy got angry because I weed in it.  And my bed was still wet.  Can I please have a new bed.  And a swing and a new bike.  And a new sister.  You can give my sister to someone else.  I love you Santa."

Some of the letters and envelopes have children's names written on them.
The elves also write to children on behalf of Santa:
"Dear Gabby.  New Zealand will be the first country we go to on Christmas Eve. My reindeer will be tired and thirsty.  Could you please leave a bucket of water out for them to drink when we reach your house.  I hope you will be asleep.  Love Santa." 

When the toys are ready, they are sent to the Wrapping Station to be carefully wrapped up.  
The wrapping station has a selection of wrapping paper, an empty sellotape spool, some curling ribbon, bows, and of course a small pair of scissors!  The table shows a small toy ready for wrapping, and small toys are scattered about that are waiting to be wrapped up.

Once the toys are wrapped, they are loaded onto the miniature wheelbarrow and taken to the Loading Station, where they are put into sacks and loaded onto Santa's sleigh.
 The loading station is a busy place, with tins, parcels, and boxes waiting to be loaded.

The sack is just a circular piece of felt, with stitches tacked around the edge, pulled together and tied off.  I put a bit of stuffing into the sack to give it some shape, and a few little boxes pushed into it that are sticking out of the top.

To finish off, I scattered a few miniature pom-poms about, added some tinsel, and some sparkly gold thread


Friday 16 December 2016

Make your own Cardboard Box Santa Sleigh


All you need to create a Santa Sleigh that the children can use for hours of pretend play or filling up with presents, is a cardboard box, scissors or craft knife, and red paint.  I used a standard A4 cardboard box, which will fit one child in, but you can use any size cardboard box you have available.
Lay the cardboard box out flat. Draw a basic sleigh shape on the long side. Repeat on the other side. Draw a straight line going across the front and back of the box, matching up with the sleigh shape on the sides of the box.

Cut out.
Paint the sleigh red.

You might like to paint the runners a different colour, or to outline the edge of the sleigh in gold. This one above is very basic, but you could go to town and add bling with stick-on gems and glitter glue, to make it pretty and fancy. You might also like to paint the inside of the sleigh, but I just left it as it was, and this did not deter the children from having lots of fun with it and pretending to be Santa or the reindeer pulling the sleigh.

Have you tried making your own Santa sleigh from a cardboard box? I love hearing from people who read these posts, so please do leave a comment. I would love to see what you create. Feel free to post photos of your sleighs below in the comments.


Tuesday 13 December 2016

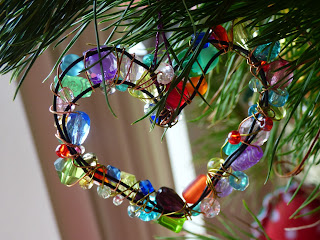
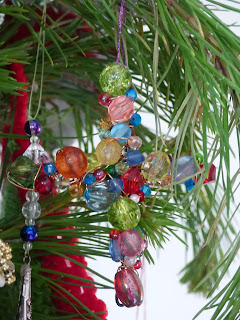
DIY Bead and Wire Christmas Ornaments

 I love beads but I have not had much experience in using beads.  But somehow I have seemed to have acquired a collection of all sorts of coloured beads, large, small, plastic, glass... I am a bit like a magpie and am attracted to sparkly things.  I find beads at op-shops, and people also give me beads, and my bead collection has grown quite a bit!  But as I am not really a jewellery maker, I needed to find other uses for them.  These Christmas decorations are fun to make and look fabulous.

You will need:
Wire.  I don't know what gauge I used, but I used a wire strong enough to hold the shape; and a fine wire (about 24-26 gauge) for threading beads on and wrapping around the wire shape. 

A selection of coloured beads

Pliers
Wire Cutters

Bend your thick wire into your required shape, and bend around again so that you have two sides. (See picture below). Snip your wire.  You do not need to attach the ends but you might like to twist them together to create a join.

Some possible ideas for wire shapes...  Cross; Heart; Anchor; Star.
 
Cut a length of fine wire. Wrap one end of the wire a couple of times around the wire where you have joined it together, to secure it.
Begin threading a selection of coloured beads onto the wire and wrap it around your wire shape as you go. 

(Back of wire heart shaped ornament)

Continue adding beads and wrapping around the wire shape.  If your length of wire is too short, simply wrap the end around the wire shape and cut another length of wire and continue, adding beads and wrap around your wire shape.  Continue until you have finished wrapping beads around your shape.

Attach a piece of thread to the top of your ornament and it is ready to hang on the tree.
 Wire and Bead cross.
 The back of the wire and bead cross. You can see where I have wrapped the thin copper wire around and around the wire shape.
 A bead and wire cross.
A wire and bead cross

 Back of the cross
 Front of the cross.


Some other ideas for making wire and bead ornaments... 
Memory wire, red and blue glass and plastic beads, and a little sailboat.


Beads threaded onto wire, with ends joined together and bent into a star shape.

Monday 12 December 2016

DIY Felt Christmas Ornaments

 I love working with felt - you don't need to hem it, it doesn't fray, it is soft and so versatile and lends itself to so many different crafts.  These felt ornaments are worth the time and effort that you spend making them and they look gorgeous year after year. 
 You will need:
Felt.  I use a mix of acrylic and wool felt - it all depends on your preference, your budget and the colours you want to use.
Thread.  I used embroidery thread - you can find such a range of embroidery threads: metallic, sparkly, etc.
Beads / sequins
Ribbon / Ric rac.
Anything else you think of that takes your fancy, eg. buttons, embellishments, old jewellery etc.
 Step 1
Create a template.  I know, I mention this ALL the time.  But your template is crucial.  It also means you can make it again and again.  I love using empty cereal packets for card templates; Acetate works fantastically for plastic templates.  

Practise drawing the ornament shapes you want on a plain piece of photocopy paper or a refill pad. I used traditional ornament shapes -  a circular ornmaent; a tear drop shape; a star shape; a heart shape; and a triangle shape (to represent a tree).

Cut out and transfer your design to an empty cereal packet or piece of clear acetate/plastic.  Cut out.

On your felt, draw around your template x 2.  You might like to do both sides the same colour, or make each side a different colour.  

Cut out.
Embellish either one side or both sides of your felt shapes with beads, lace, ribbon sequins, strips of coloured felt, ric- rac, etc.  

The tree above was decorated using old broken jewellery. 

 The star uses two different sizes and two different colours.
 Cut out a small piece of felt for the top of the ornament x 2.
Cut a length of ribbon for hanging.

Put the two sides of your ornament together;
Sandwich the ribbon in the middle, at the top of your ornament;
Pin the little top pieces of felt to the top of your ornament.

Sew the two pieces of felt together, Leave a gap for stuffing; fill with stuffing; sew up the gap.
Note: It is completely up to you how much stuffing you use.  It is your own preference.  I like to use a little bit of stuffing to give a bit of shape.  You might like to keep it flat like the above ornament.  Or you might like to fill it out a little bit.  There is no right or wrong.
 Felt circular shaped ornament, with white and purple strips of felt, pale purple ric-rac; metallic embroidery thread; purple felt for the top of the ornament and pink ribbon for hanging.
 Pink wool felt; blue felt; ric rac; beads; glossy embroidery thread; pink ribbon for hanging.
Pale purple acrylic felt; strip of white felt; strip of pale pink felt; ric-rac; sparkly embroidery thread; beads; dark pink felt and pink ribbon for hanging.

Saturday 3 December 2016

Felt Heart Christmas Decoration

 This is a really easy little Christmas decoration you can make with children and just requires some basic hand sewing skills.

You will need:
Felt
a button (or buttons) to decorate
needle and thread
stuffing
scissors
paper and pencil
 Create a heart template by drawing a heart onto a piece of paper or card and cut out.  If you want it symmetrical, fold your paper in half and draw half a heart and then cut it out.

Place template on felt and cut out.
 Begin by sewing a button in the middle of one of your hearts. 
You could sew a button onto each side.
Or you could cover one side in a variety of coloured buttons. Or beads. 
 Place the two hearts together (right sides facing out) and sew around the edge.  Leave a gap for stuffing. I find the blunt end of a wooden skewer works well for pushing stuffing into small gaps.
 Sew up the gap. Add thread or ribbon for hanging.


Friday 2 December 2016

Christmas Decoration... Peg Angel


I was preparing some materials ready to make Christmas Decorations with my niece and nephew, when I came across a template for angel wings. That gave me an idea... I pulled out a wooden peg doll, cut a semi circle of white felt which I glued onto the peg doll, and cut out angle wings on white felt using the template, which I glued on the back. Success! This was a super simple craft that just requires wooden peg dolls, and white felt.
 A peg doll, a rough quarter circle cut out of felt and wings cut out of felt.
 To make an angel wings template, fold a piece of paper in half and draw half an angels wing. Cut out and open it to check you are happy with the shape.

Place the folded template on the fold of the white felt, and cut out.
 Wrap the semi-circle around the peg doll, so that the felt joins at the back of the doll but is not tight around the whole peg - it should be like a cone shape. It takes a little bit of fiddling around to work out how to do it.

 Hot glue the felt to the back of the peg.  It's ok if it doesn't completely cover the back of the peg.
 Hot glue the wings to the back of the dress.
Cut a little bit of sparkly pipecleaner and wrap around your little finger to create a circle.  Hot glue onto the top of the angel's head.