Tuesday 30 August 2016

Nga Manu Rima - 100 Days Project: Mat time resources

 Today's mat time resource is a lovely little counting song in Te Reo Maori called Nga Manu Rima (5 Birds).  You can find the song on Nga Pihi 2 Songbook. This was a quick project to complete, with only having to make 5 birds which are cut out of felt. 

Click on the link for more of my teaching resources

Sunday 28 August 2016

A Hog on a Log -100 Days Project: mat time resources

I have been playing with these words for a long time now and have had this story in my head for several years.  I have since found out that there is a children's book already published called A Hog On A Log, but I haven't read it, and am reluctant to as it might spoil my dream.

Anyway, today's mat time story is a story that I have made up.

A Hog On A Log

 In the bog, the squishy slimy bog,
There was a log.
 A log in a bog.

And on that log,
that long, gnarly log,
there was a hog.
 A hog on a log in a bog.

And on that hog,
That very hairy hog,
There was a dog.
 A dog on a hog on a log in a bog.

And on that dog,
That friendly, happy dog
There was a frog.
 A frog on a dog on a hog on a log in a bog.

A frog on a dog.
A dog on a hog.
A hog on a log.
A log in a bog.
A log in a bog
Under a hog
Under a dog
Under a frog.

And that is how they stayed.
 Until one day, dark clouds rolled in.  Thunder crashed.  Lightning flashed.  The winds swirled and whirled around and around.
Suddenly something fell out of the sky and landed on the frog.
A wooden clog!

A clog
on a frog
on a dog
on a hog
on a log
in a bog.

And that is how they stayed.

Click on the link for more of my teaching resources.

Saturday 27 August 2016

Brown Bear, Brown Bear, What do you see? - 100 Days project: mat time resources

Today's story was Brown Bear, Brown Bear, what do you see? by Eric Carle.

All animals were cut out of felt, with the simple addition of a black eye using a fine Sharpie pen. I tried to keep the shapes as simple as possible.  I didn't do a teacher or children because I am the teacher, and the children are the children, so the story comes off the board and into the room.

I used clear acetate to create the templates.  These templates will most likely be reused as I create more stories as the project goes on - the horse, duck, dog, sheep and frog templates will be perfect for Old McDonald Has a Farm, and other farm-based stories.


The story has simple, repetitive language, and is a great introduction to getting children to tell stories themselves. It empowers young children to become the story teller, and they can put the animals in any order they want. When children begin school, they will be expected to write stories. I believe they will not be able to write stories until they can tell stories. They need to be able to have the language, be confident with using language, and knowledge of sentence structure and how stories work, in order to be able to tell good stories. And I have found that having these story sacks out for children to be able to use and access themselves, without being teacher directed, enables them to build up all these skills. Of course, they still ask me to tell stories, and I willingly do so. I am the role model of telling stories. Children need to hear the stories before they can tell the stories.

Click on the link for more of my teaching resources.

Little Bee - 100 Days Project: mat time resources

A felt storytelling resource to go with the story 'Little Bee' by Edward Gibbs.  The hunter, lion, hyena, mongoose, snake, frog and bee are all made of felt. Details added using fabric paint.

This story has lots of simple, repetitive language and is a lovely, fun little story about the animals all being chased by a larger animal. It is an easy story for children to be able to tell themselves.

I used acetate (a clear plastic) to make a template of each animal.  You could also use a clear laminating sheet. Animals such as the snake and bee were drawn on paper first to check the shape and size, and then drawn freehand onto the felt.  The other animals required a template.  I drew several frogs before settling on the shape of the frog above, while the lion, hyena and mongoose were traced using images on the iPad. I found an image on the iPad, put clear acetate over it, and used a black permanent sharpie to trace around it. This is an excellent way to create templates if you are not an artist!

Click on the link for more of my teaching resources.


The Princess and The Pea - 100 Days Project - Mat time resources

Felt resource for the Princess and The Pea storytime... King, Queen, Prince, Princess, bedframe, pea, and 20 feather mattresses.

The royal family were made using a basic shape cut using beige felt.  Details to the face were added using a fine nib Sharpie pen.  The clothes, hair and crowns were made using scraps of felt cut to fit and glued on top of the basic shape using PVA glue.  Edging detail was done using a tube of glitter glue.

The mattresses were simply thin rectangles cut out using different coloured felt to place on top of a basic bed frame, and the pea was a small circle cut out of green felt.
The feather mattresses can also be used to teach colours and counting.

I told this story at mat time, using the felt characters. Then after lunch, when we have quiet time, I laid out a few of the felt stories that I have made so far on mats around the room, so children could choose to do one themselves if they wished. Little groups of children gathered around the various stories and they sat down and began telling stories, taking turns to put the felt characters on the mat, usually with one narrator and when they had finished, someone else would begin, telling the whole story again. It is so exciting to hear all the language happening around the room, and to see the Tamariki so engaged, so focused, working co-operatively, collaboratively and independently without being teacher led, and making up their own story if they don't know it.

One child ripped one of the feather mattresses in half, and another child said, "Now there's only 19 mattresses!". I thought to myself "That's subtraction! And he is only 4!" I was thrilled to see an example of how important play is, and how through their play, children pick up these concepts of maths and literacy and figure things out for themselves - incidental learning. You can't plan for incidental learning, but by providing a well thought out stimulating environment and open ended resources, you set the scene for incidental learning to occur.

The children have been going back to the story sacks again and again, choosing to tell stories, to listen to stories, to combine stories to create a whole new story, asking teachers to read them the book while the children put the felt pieces on to the mat as the story unfolds. They are in charge of their own learning, they are empowered to have a meaningful literacy experience as they take control, and it has been a heartwarming outcome of my project so far.

Click on the link for more of my teaching resources.

10 Apples Up On Top - 100 Days Project: mat time resources


I made a felt resource to go with Ten Apples Up On Top by Dr Seuss.  This was a huge hit at mat time, with children taking turns to put an apple up on top while I read the story, and counting how many were there and how many more we needed.

Then after lunch some of the children did it themselves, working together and finding the corresponding numbers which they put next to each apple.

I made a basic apple shaped template, and a face template.  Details were added to the face using a fine Sharpie pen, and the hair was a scrap piece of felt glued on top using PVA glue.

This has been a hugely popular story that children choose to do every day in their own time. There was a lovely moment one day when a group of three children had sat down to do this story together. One girl had the book, and was turning the pages (she was the 'teacher'), while the other two took it in turns to put the felt apples on the board. They counted how many apples were in the picture in the book, then made sure they put the same amount of apples on the mat. They were busy counting and checking as they went methodically through the book, turning each page and spending time looking at the picture and counting to see how many apples they needed.

Another group of children used number magnets when they did the story. They had a basket of magnets, and after they had put the apples up on top, they spent time looking for the right number to put next to each number. If one had trouble, another one would find the correct number and say "Here it is!". They were learning number recognition, ordering, and before and after numbers. And problem solving, as they figure out how to make number '10'. They were checking the order of the numbers themselves, correcting themselves, and learning from each other. I love how these story sacks empower children to take the story into their own hands rather than being teacher directed. It is so powerful and the learning that happens from it is incredible. I love seeing how engaged they are, for extended periods of time, as they engage with the story, and listening to the language that evolves from it.

Some children even put the apples on top of their own heads! I want to make red and green beanbags so we can see how many 'apples' the Tamariki can balance on their heads! That could be a fun way to include a physical aspect to the book.

Click on the link for more of my teaching resources.

Friday 26 August 2016

Fidget bracelets


I got the idea for these after 2-3 incidents over the past year where children sitting on the mat listening to a story have picked up something they found on the floor and put it up their nose or in their mouth. I have a friend who wears 'Stimming Jewellery' - jewellery cleverly designed for people who stim, such as those with autism and other learning needs, and also those who need to constantly fiddle with something in order to pay attention. I know from my own experience that having something in my hand to play with does not detract my attention from listening to others, but it is quite soothing and almost obsessively sensual.

So I decided to try making something that children can fiddle with quietly while we have mat time. There are some children who struggle to sit still, while others have trouble paying attention to a story. These fidget bracelets will hopefully help to support those children who need to move or be doing something, and hopefully stop them peeling and unpeeling the velcro straps off their shoes (velcro is so noisy!) and prevent them from picking up random things off the floor and putting it up their nose.

One of our parents kindly donated lots of ribbon to our centre, so I cut lengths of ribbon and laid out a variety of large wooden rings and bits with holes in them and plastic beads. Children threaded 1-3 rings or beads on a length of ribbon and I fastened them with a reef knot. They are too big to go into noses or ears, and too big to be swallowed. Having only one or two beads means they are not going to make an irritating clicking sound, and using wide ribbon makes it easy to hold, slows the beads down and requires you to purposefully push them around the length of ribbon.

I also gathered up some beanbags and a koosh ball and placed them in a teachers basket together with the fiddle bracelets to be given out to children who have trouble paying attention at mat time. I explain to the tamariki that these bracelets are to help them concentrate and focus at mat time - if it distracts them, then it is not suitable for them. After mat time, those that have got one can return them to the basket before going to wash their hands.

For those that are wondering about how fair it is to give one child a fidget bracelet but not another... fairness is not about everyone having the same thing, but allowing everyone to be on the same playing field - in other words, giving those that need it the tools they require to be at the same level as the others. When I was completing my Bachelor of Education, I made good use of the library at the University Campus, and got out many books on teaching, even though they were not part of my required reading for the courses I was doing. I found that I just loved learning more and more, and I read voraciously on things that interested me. One book I got out on teaching children with diverse needs explained the concept of fairness as three children of different height, all asked to reach a button on the wall. The tallest can do it easily; the middle one can do it if she stands on her tiptoes; the smallest can't reach at all. Fairness is giving the small one a stepladder to stand on, so he can reach it too. At mat time, there are children who are easily able to pay attention, to sit still, and to listen. But there are also children who find it challenging. Fairness is giving them the tools they need to be able to listen too, so that they don't miss out on learning.

Sunday 21 August 2016

Creative Inspiration tags

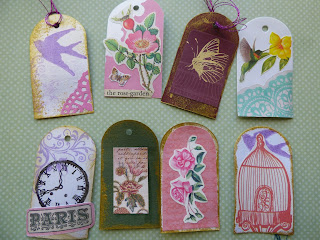
 There are some days when I go into my craft room and I just don't know what to make.  This project put a stop to that, because now whenever I want to make something but can't decide what to do, I simply choose a Creative Inspiration tag from my jar.  I created lots of tags, decorated the front, and wrote down a whole heap of different crafts and things to make and do on the back.  Then I popped them into a jar.  
 I cut out a whole heap of tags using my Cuttlebug and a tag die.
 I then decorated them, using a variety of...
scrapbooking paper
stamps
doilies
illustrations from old books
wrapping paper
postage stamps
paper punches
stick-on gems and bling
images from magazines and calendars, old greetings cards, gift tags and postcards
lace and ribbon


 Once I had decorated a whole heap of tags, I began writing different crafts on the back... things I know I can make, but also some things that I would like to try or learn, such as knitting! 


Now whenever I don't know what to do, I can choose a tag to help inspire me and provide focus.

This idea can also be adapted to...
Things to do when you are bored: eg read a book; do a jigsaw puzzle; colour in; bake biscuits, etc; Things to do for date night with a special someone;
Things to do at the weekend with the kids;
Special notes to a loved one, each note saying something you like/admire/love about them, or a reason why they are wonderful!;
A short poem;
If you are a writer, you might like to write a provocation or word on each one. Each day pull out a tag and that is what you write about.  You could also use this idea for a visual diary or journal;
Whatever else you can think of.

Saturday 20 August 2016

Make Your Own Greeting Cards

I think handmade greeting cards are a special way of telling someone you care about them, because you have spent time and effort creating something especially for that person.  You can make them personal and unique and tailor a card to a person's interests, hobbies, and passions.  

I am not going to tell you how to make cards, rather this is just to share some cards that I have made in the hope that it will generate ideas, inspiration, and further creativity.
 You need:
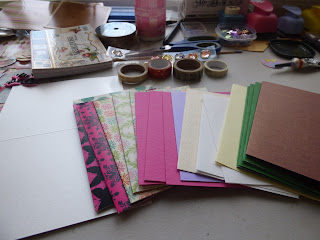
*Cardstock - you can buy pre-made cards, pre-printed cards, and blank card which you can cut down to size and fold in half.  An A4 size sheet of card folds into an A5 size greetings card; an A5 sheet folds into an A6 size greetings card. 
* Glue

To decorate your card, you can use a variety of things, such as...
*Printed paper to decorate - eg. scrapbooking paper; wrapping paper; postage stamps; illustrations from old books (old children's picture encyclopedias are great and you can often pick them up very cheaply at charity shops); images cut from magazines;  images cut from old calendars...
*Stamps and ink
*Paper punches
*Washi tape
*Stick-on bling
*Embellishments - The Warehouse often has embellishments in the clearance bin for .97c for pretty things to stick on cards.

 These are some of the cards I have made...
 Stamps, embossing powder, paper punches, decorative paper
 Decorative paper and washi tape
 Pretty tissue paper and embellishments
 Decorative paper cut into a teapot shape; coloured paper; gold outliner paint
 Small placecard holder; embossed paper; stick-on bling; hand-made paper flower
 Decorative paper; bird stamp; embossing powder
 Embossed card using the Cuttlebug; paper punches; decorative paper; stamp and black ink
 Embossed card using Cuttlebug; stamps and ink; decorative paper; stickers
 Oriental paper; coloured paper embossed using Cuttlebug; silver wax rubbed over embossed image
 Embossed geisha image using Cuttlebug; oriental paper
 Decorative scissors; metallic paper; ribbon; stamp; handmade paper; gold outliner paint
 Paper doily; image from old book
 Pre-printed card; hand-drawn mixing bowl coloured in on plain paper and cut out; embellishments
 Pre-printed card; embellishments
 Decorative paper; stamp and ink
 Sheet music printed on teabag stained paper and ripped while wet; metallic handmade paper; coloured paper; gold outliner paint
 Decorative paper; paper punched flowers; bird stamp; cage cut from wrapping paper
 Paper embossed using Cuttlebug; decorative paper; glitter; embellishments
 Paper doily; image cut from an old book illustration
 Pre-printed card; Mixer drawn onto plain paper and cut out; embellishments
 Plain card folded in half; decorative paper; stickers; embellishments
 Washi tape; embellishments; stick-on bling
 Dress cut out of decorative paper; coloured paper
 Pre-printed card; embellishment
 Pear shape cut out of decorative paper
 Plain card embossed using Cuttlebug; decorative paper; paper punch; stamp & ink
 Pear shape cut out of decorative paper
 Pre-printed card; Dress cut out of decorative paper
 Scrapbooking paper; decorative paper; star sequins; washi tape
 decorative paper; embellishments
 Flocked paper; embellishments
 Pre-printed card; washi tape; embellishments
 Decorative paper; stamps & ink
 Pre-printed card; scrapbooking paper
 Scrapbooking paper
 Scrapbooking paper
 Pre-printed card; scrapbooking paper
 Pre-printed card; scrapbooking paper
A5 Green card folded in half; old Winnie The Pooh calendar; paper punch; washi tape