This is a sweet little ornament that is easy to make, using two circles and one heart shape, which can embellished as much or as little as you like.
Click on the link to see all my other craft tutorials
Click here to see all my Christmas related tutorials
Wednesday, 6 September 2017
Saturday, 12 August 2017
Fairy Doors
I admit it, I have been rather enchanted with fairy doors at the moment. There are so many sweet fairy doors around at craft markets and on Facebook. But I like to make things myself, and I am not much of a woodworker. So I sat down and played around with some ideas and scrap felt. I wondered if it was possible to create a fairy door from felt. I soon found came up with an answer: yes it is! And I am secretly very pleased with the results and can't wait to make a whole lot more!


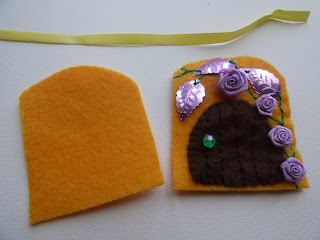


I drew various shapes for fairy doors and the background on paper, before cutting out of felt. It doesn't matter what shape you use - it can be uneven, round, or straight. You could even make a hobbit house shape. I just cut my felt shapes freehand, but if you like, you can make a template first.


If you want to create a panelled look on your fairy door, stitch lines on your door before sewing on a bead for the door handle.

You will need to cut out one door, and two pieces of felt for the fairy house.

You can use whatever you have on hand for embellishment... sequins, ribbon roses, flowers, beads....

Position your door on one piece of the felt house, and sew into place.
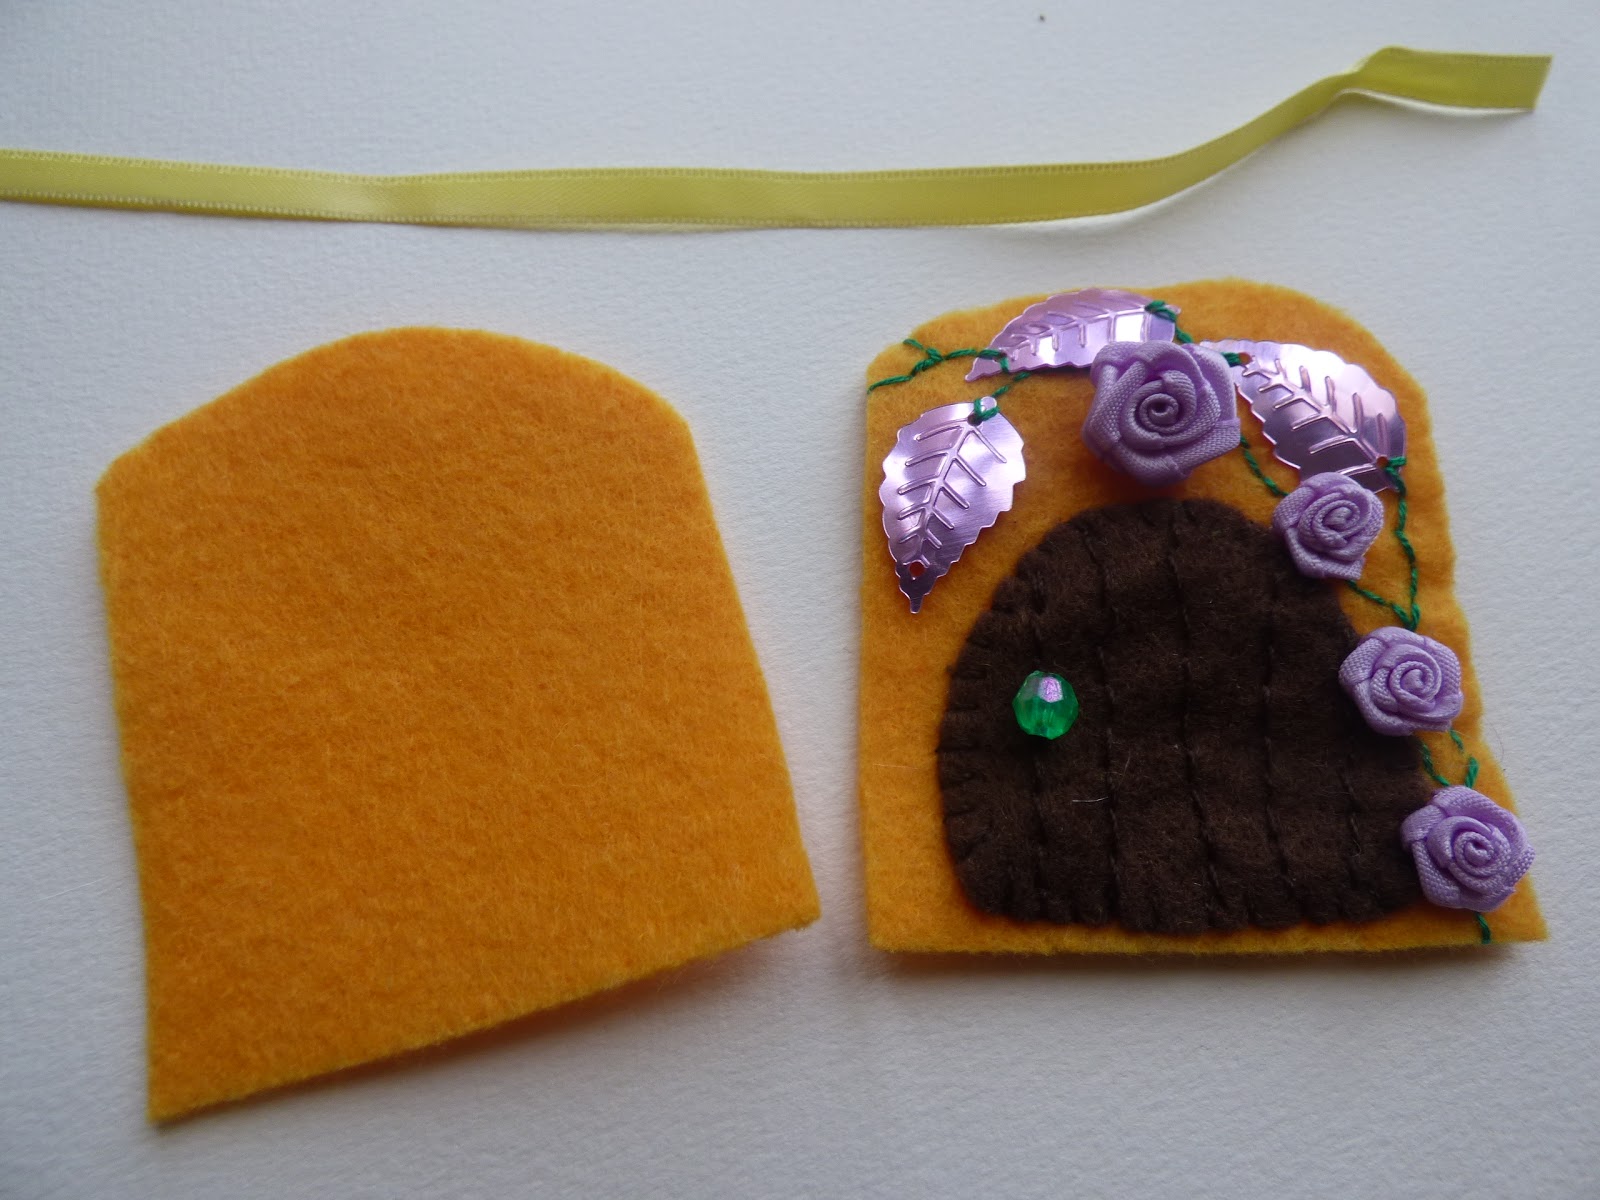
I used two strands of green embroidery floss to embellish with. Stitch sequins and flowers firmly into place - I went over them a few times to make them secure.

If you want to be able to hang your fairy door, sandwich a loop of ribbon in between the two pieces of felt. Use blanket stitch around the edge of the house to sew the two pieces of felt together.

Click on the link to see all my other craft tutorials.
Click here to see all my Christmas related tutorials
A Festive Fairy Door

I cut out two red shapes for the fairy house, and a white door. You can use whatever colour-way you wish - you could do a white house and a red door.
If you want panelling on your door, stitch your lines using backstitch on your door first, before attaching it to the house.
I cut out a tree shape from green felt, and a trunk out of light brown felt.
I folded a scrap of green felt in half to cut a circle, and then cut the middle out of it, to create the wreath.
Lay your pieces out on one of your house pieces, and begin stitching. I added beads and sequins onto the tree and wreath as I stitched, and a bead for the doorknob. Stitch each bead and sequin through twice, to ensure they are securely fastened.
When you have finished the top layer of the fairy house, position it on top of the second piece of the fairy house, and sandwich a loop of ribbon in between.
Blanket stitch around the edge, securing the ribbon firmly.
Click on the link to see all my other craft tutorials.
Click here to see all my Christmas related tutorials
Thursday, 20 July 2017
Early Literacy Resources
I love early literacy - it is an area I am passionate about, and I am always looking for creative ways to teach it. Early literacy is so much more than just ABC's. I was fortunate enough to work in an early childhood centre a few years ago that had Barbara Brann's Casey The Caterpillar programme, and Barbara Brann came over and did a few Professional Development sessions with us. She is amazing. If you ever get a chance to look at her work, or to have her come to your centre, it is certainly worth it. I have learnt so much from her and continue to use what she has taught me - and I have so much more to learn from her.
One of the crucial things she talks about regarding literacy are the 5 domains: Thinking; Looking: Movement; Talking; and Print. There are so many skills that make up the foundation of literacy which children need to be able to do, before learning their ABC's or learning to read or write. I am not going to go into it here, but I just wanted to share some resources I created which help support the development of the various domains - and they are super easy to make.
 This activity supports visual discernment. Are they the same, or is one facing a different way? Which one is not the same? Why? Children need to be able to identify which one is different out of a group of 3, and say why. This was simply made using black mat board, and a white outliner paint. You can get the same effect by using any container with a nozzle, and filling it with a mixture of PVA and acrylic paint - white paint for black mat board or black paint for white mat board. I cut the matboard into squares, and made simple shapes/lines which I repeated, to make sets of 3.
 These are tactile boards for children to be able to touch. They offer a range of sensations. I simply used squares of matboard, and gathered up a selection of fabrics and ribbons which I glued on:
Ribbon
Yarn, wool, and string
Flocked paper
Buttons
Mesh
Corrugated card
Fur fabric
Leather
Suede
Velvet
 This is a game I created using colour chips from the hardware store, a decorative punch, and black mat board.
The idea is to support visual discernment by finding the matching colours.
I collected a range of colour chips from the local hardware shop, and punched two flowers out of them.
I drew a grid on the mat board (I think the squares were 5cmx5cm) and glued the flowers in the centre of each square. Then I used the guillotine to chop them into squares.
 These are the cards after I guillotined them.
 I set up the game on the table for children to play. You could do it face down, and make it into a memory game, but I began with the flowers face up, so that the children could see the colours to distinguish between them.
This activity supports fine motor skills and patterning. I drew taniwha's; the children coloured them in and then cut them out; I punched a hole in one side and tied laces to them; the children threaded the cotton reels (or beads) onto the taniwha's 'body'.
 Lines. Children need to be able to follow a line before they can begin to read in a straight line or write in writing books. Some children need support with following a line, and this is one way I help them.
This is simply lines and shapes painted on a table (using acrylic paint which washes off) and plates of shells, pebbles, lids, pompoms etc for children to place along the lines or in between the lines. It just lets them play and explore lines.
 I created these pattern cards to inspire and hopefully stimulate pattern work; drawing patterns and lines; making up their own patterns. It shows children different ways to fill in space. I made these pattern cards using white outliner paint on black mat board. You can use a bottle with a nozzle, and a mixture of PVA and paint. PVA helps to create a raised outline which is tactile and nice to touch when it is dry - perfect for running your fingers over to feel it. I cut the matboard into squares and painted a different design on each square.
You can get matboard from your local picture framers or art store. Our local picture framer makes up 'Kindy Bags', full of matboard scraps which they give away to local childcare centres, as otherwise they throw it away. Check with your local picture framer if they have matboard scraps which they could give you.
Click on the link for more of my teaching resources
One of the crucial things she talks about regarding literacy are the 5 domains: Thinking; Looking: Movement; Talking; and Print. There are so many skills that make up the foundation of literacy which children need to be able to do, before learning their ABC's or learning to read or write. I am not going to go into it here, but I just wanted to share some resources I created which help support the development of the various domains - and they are super easy to make.
Spot The Difference
 This activity supports visual discernment. Are they the same, or is one facing a different way? Which one is not the same? Why? Children need to be able to identify which one is different out of a group of 3, and say why. This was simply made using black mat board, and a white outliner paint. You can get the same effect by using any container with a nozzle, and filling it with a mixture of PVA and acrylic paint - white paint for black mat board or black paint for white mat board. I cut the matboard into squares, and made simple shapes/lines which I repeated, to make sets of 3.
Sensory Boards

Ribbon
Yarn, wool, and string
Flocked paper
Buttons
Mesh
Corrugated card
Fur fabric
Leather
Suede
Velvet
Colour Matching Cards

The idea is to support visual discernment by finding the matching colours.
I collected a range of colour chips from the local hardware shop, and punched two flowers out of them.
I drew a grid on the mat board (I think the squares were 5cmx5cm) and glued the flowers in the centre of each square. Then I used the guillotine to chop them into squares.


Threading the Taniwha
This activity supports fine motor skills and patterning. I drew taniwha's; the children coloured them in and then cut them out; I punched a hole in one side and tied laces to them; the children threaded the cotton reels (or beads) onto the taniwha's 'body'.

Lines

This is simply lines and shapes painted on a table (using acrylic paint which washes off) and plates of shells, pebbles, lids, pompoms etc for children to place along the lines or in between the lines. It just lets them play and explore lines.
Pattern Cards

You can get matboard from your local picture framers or art store. Our local picture framer makes up 'Kindy Bags', full of matboard scraps which they give away to local childcare centres, as otherwise they throw it away. Check with your local picture framer if they have matboard scraps which they could give you.
Click on the link for more of my teaching resources
Friday, 14 July 2017
Paper Fans Tutorial

A friend is in charge of decorating the school hall for a ball they are putting on for their students. They are on a limited budget, so I thought I would have a go at seeing what I could make to contribute. I have got lots and lots of scrapbooking paper in my craft room, so I grabbed some paper and set to work.

The paper fans are so easy to make. I used two sheets of paper to create one fan. Scrapbooking paper is 12" x 12", so all the sheets were squares and I didn't need to trim them.
To make folding easy, I put one sheet on top of the other, and concertina-folded both sheets at the same time. Then I separated the two sheets, opened each sheet into a semi-circle, and glued the two semi-circles together to create one circle.


I used a needle and thread to pierce through the paper, ready for hanging.


I threaded beads onto the thread, to help hold the fans in place.
Saturday, 10 June 2017
Needle felted Angels Tutorial

I know there are a lot of tutorials on how to make these needle-felted angels, and I am sure I learnt from a tutorial on Twig & Toadstool's blog a few years ago, but I cannot find it. So here is one. I hope it is simple and straightforward enough. These angels are not complicated to make and do not take long to make once you have mastered the basics.


You will need some felting needles, and a pad to work on. You can either use a sponge pad (car wash sponges work well) or a special brush pad which you can find at specialty craft shops.
You will also need wool roving, which is carded, unspun wool. Sheeps wool is best to use - goat or merino is too fine to use and doesn't needlefelt well.
Pull off (don't cut!) a length of wool roving. The pen is there to give you an indication of size. The longer the wool, the bigger the angel/fairy will be. Pull off a smaller length of roving for the arms.

Tie an overhand knot in the middle of the longer length of wool roving... the knot becomes the head of your angel.
Take the smaller piece of roving and roll into a sausage like length between your palms. Press hard and rub rapidly back and forth to create a sausage shape. This is the start of the felting process.
Then place the arms on your mat, and stab with your felting needle, using an up-and-down motion. Go up and down the arms, and turn the arms over as you go - remember you are felting a 3D object. As you felt, fibres will be pulled through to the other side, and it can become a bit 'fluffy' with fibres sticking out. Roll it firmly between your hands again and this will felt the loose fibres back into the arms.

Take your roving with the overhand knot in the middle. Open it up and slide the arms underneath the knot, so the remaining wool hangs down either side of the arms.
Take a very thin strand of wool roving and twist it slightly. Begin wrapping the thin strand around the base of the overhand knot to create a head shape. You don't need to tie it off - just wrap it around and it will stay. Wool is very strong. You might like to stab it slightly with a felting needle to hold it in place.

Then take another thin strand of roving to wrap around the waist and over the arms. This will secure the arms to the angel.
To do this, find the middle of the length of the strand, hold it against the angel's back with your thumb/finger and wrap it once around the waist. Work with one side of the strand at a time. Bring it diagonally from the waist up to the opposite shoulder, and back down the other side on a diagonal. Do a half-wrap around the waist and bring it up on a diagonal to the other shoulder, and back down to the waist. Keep repeating until you reach the end of the strand; then repeat with the other end of the strand. You do not need to tie it off.

If you want to, you can wrap a little bit of roving around the 'wrist' to create a hand shape. I used to do this but I don't any more. I find it easier just to roll the arms into a sausage shape.

This is the base of your angel.

To dress your angel, lay the angel onto your mat.
Pull off a length of wool roving in the colour of your choice.

Fold the wool roving in half and place onto your angel. You can do this a number of ways:
1 - Place the fold over your angel's shoulder, so that it covers the front and back; and stab into place;
OR
2 - Place the fold underneath the neck of the angel, so that you are just doing the front; and then do the same on the back;
OR
3- Place the fold on her waist so that you are creating the skirt, and use a different colour for her top.

Once you have stabbed the top into place, you can lightly stab the roving onto the skirt. You might like to add a second colour onto her skirt. Play around with ideas and colours.

When you have done her top and skirt, it is time for her hair.
Choose some roving for your angel's hair, and pull of a suitable length.
Place the head in the middle of the length of hair, and begin stabbing into place.


To add flowers to her hair, take a small length of roving, and wrap around your little finger. Pull off and put into place on her hair. Stab into place. Get a tiny piece of another colour and roll into a little ball. Place in the middle of the flower and stab into place.


This angel has flowers spiralling around her head.
The flowers on her dress were done in the same way as described above. I lightly felted some green roving together, and stabbed the flowers into place on the green roving.
Then I attached the 'field of flowers' to her dress.

This angel has plaited hair, tied off with silver thread.
Play around with embellishments: different types of yarn, embroidery thread, Angelina, ribbons feathers. There are no right or wrongs - just have fun and try out ideas.
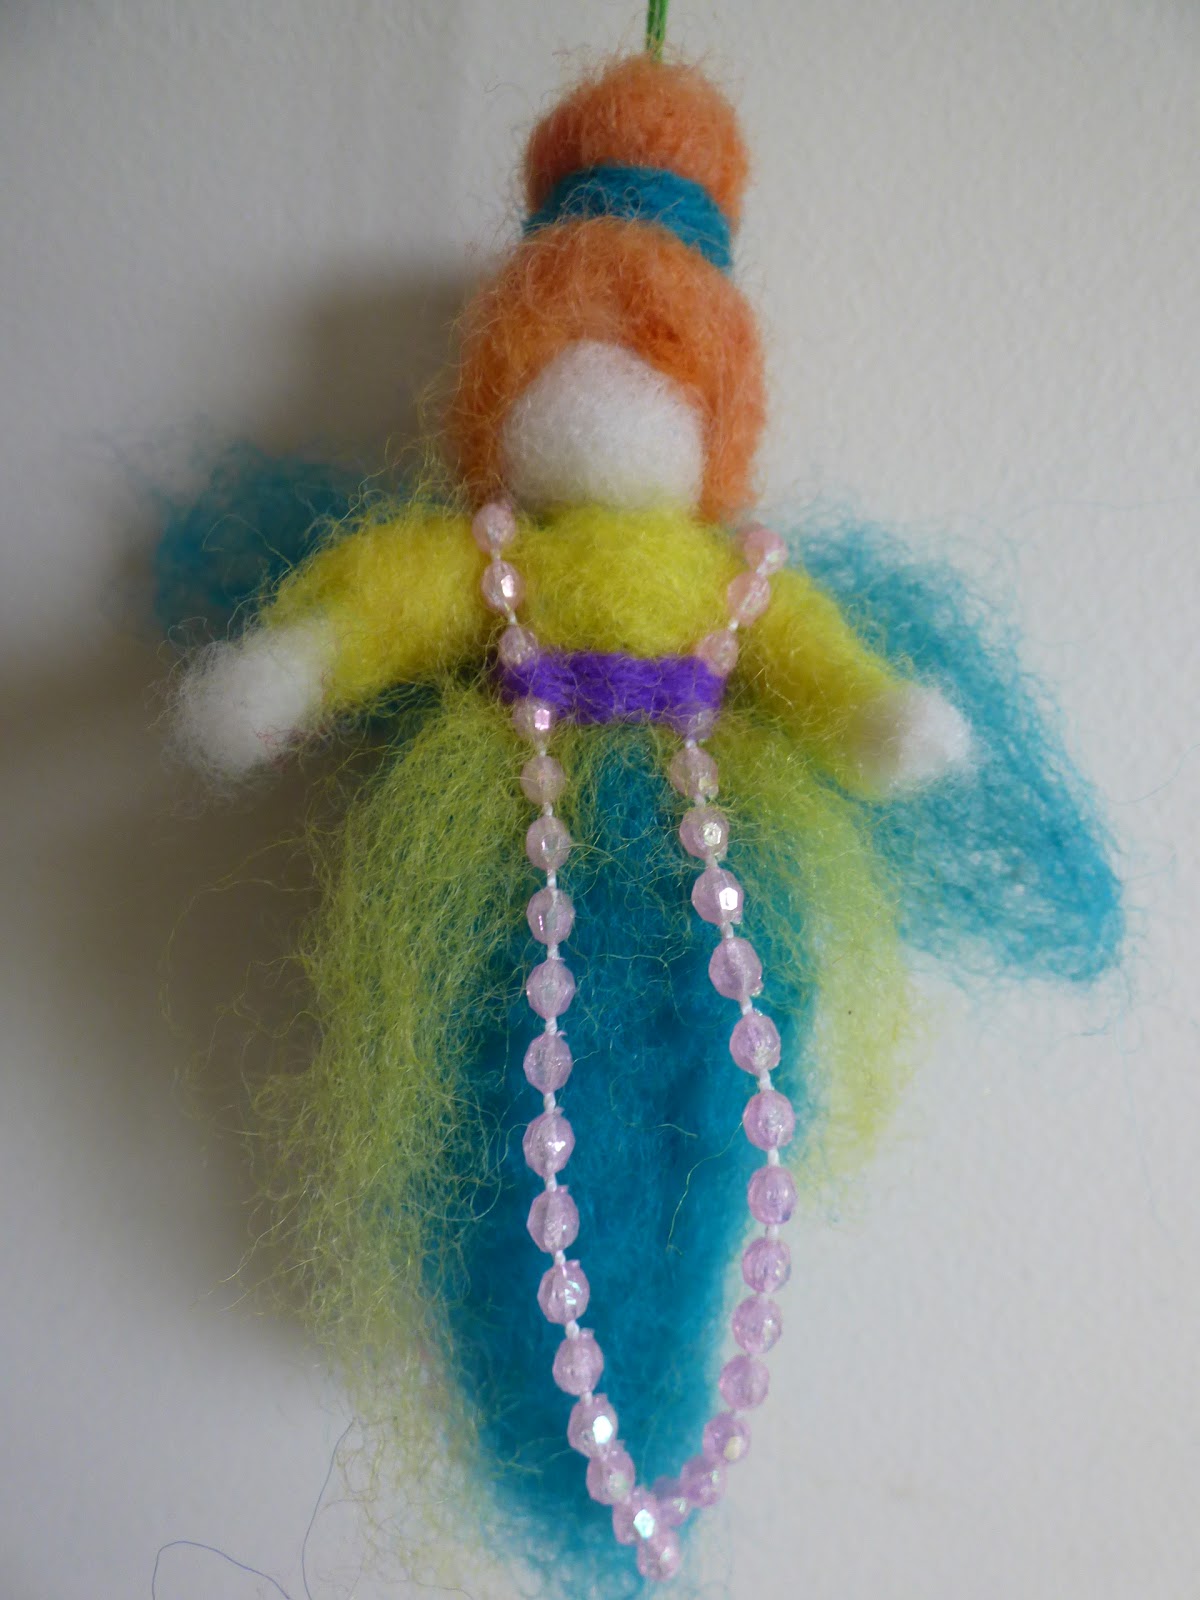
To attach embellishments such as feathers, ribbons or beaded strings as above, I wrap wool roving around it (as you can see in the above photo) and stab the roving into place. This secures your embellishments. You could try sewing them into place, too.

These flowers were done the same way as detailed above - wrap a small strand of coloured roving around your little finger, pull off and stab into place. I attached the flowers to the lavender coloured roving before putting it onto the angel. Then I wrapped a thin ribbon around her waist and tied it off at the back.

My 100 Days Project so far... 100 Days Project: Angels for Babies (100 Days Project website link)
Friday, 9 June 2017
Matchbox Babies


The craft matchboxes are slightly smaller than real matchboxes, and a bit less sturdier. You can use either, or both. To decorate the matchboxes, you will need:
Matchboxes
Decorative paper
Ruler
Craft knife
Craft glue - PVA is perfect.

Measure your matchboxes (both the outside cover and the inside tray) and transfer your measurements to your paper. Cut using a craft knife and ruler.

Fold the paper around your matchbox and make sharp creases along the folds.
Apply glue to your paper. I used a bit of thick card to spread the glue evenly and thinly across the paper.

Wrap the paper around the matchbox.


Cut a piece of felt and glue down to the base of the matchbox inner tray.


Cut a square of felt for the blanket to keep your baby nice and cosy!


Subscribe to:
Posts (Atom)