Monday, 25 December 2017

Decorated Clipboards & Noticeboards

These decorated clipboards make super affordable, attractive and practical gifts, that can be easily personalised for that extra special touch.  They can be used for holding shopping lists, To Do lists, important pieces of paper, letters, phone numbers, notepads, reminders and notices from school. I am sure you can think of a million other uses for them too!


 You will need:
Clipboards (I picked up mine from a local Savemart Store - the small ones were $1.50 each, and the large ones were $2 each).

Strong craft glue
Craft knife
Sandpaper
Pencil
Ruler
Decorative Paper
Ribbon
Embellishments


Start by sanding your clipboards. I used a grade 2 sandpaper to create a rough edge for the glue to hold onto. The first time I made these, I didn't sand them - and the papers peeled off.


Sort out and co-ordinate your decorative papers that you intend using. I made several groups of co-ordinated papers before choosing which ones to use.


I found the clipboards had slight variations in size, so I drew around the clipboards onto the paper to get the sizes right, and cut out using a craft knife.


 Measure where the top of the clip is on your clipboard, and transfer the measurements onto the paper, so that the paper fits neatly on either side of the clip.

Spread glue over your paper and position on the clipboard. Use a brayer, a sponge, flannel, or a bone folder to smooth out the paper over the glue.

To make the cooking themed clipboard above, I used a green circle patterned paper as my base, with a lemon patterned serviette layered over the top. Pictures cut out from magazines were added, along with an Apron embellishment and strawberry stickers.

Start adding embellishments such as stickers, bling, stick-on gems, washi tape, paper doilies, etc.
Mini blackboards may be added and stuck on.


A pen/pencil holder can be made by rolling a rectangle of card around a pencil or pen. Use double sided tape to secure into a cylinder shape. Use another piece of double sided tape to stick the pencil holder onto the bottom of the clipboard. It is best for pencil holders to be horizontal rather than vertical, otherwise a pencil may fall out.


You may like to add a ribbon onto your clipboard. I didn't glue the ribbon onto the front of the clipboard, so that paper or the back of a notepad can be slipped through and hooked over the ribbon. If adding ribbon, you will need to make the ribbon approximately three times the width of the clipboard. Begin by gluing it across the back of the clipboard; take across the front; and glue down over the back again.


When I first bought the clipboards, I peeled the label off the back, and it made a rather unsightly mark. I simply covered the back with a piece of patterned paper to hide it. I placed the clipboard straight onto the paper and cut around it with the craft knife rather than measuring and drawing and cutting.


This one was created using a wooden placemat, rather than a clipboard. I used decorative papers, and stuck a notepad on one side (it is removable) and a blackboard on the other.  I have it in the kitchen and is great for jotting down items on our shopping list as I think of them or when I use the last of something. It is also handy for phone messages or any time I need to find a piece of paper and a pen.

It has one pencil holder for the blackboard, and one pen holder for the notepad.


Check out my other craft tutorials here.


Playing with Felt

I enjoy just being able to play around in my craft room. I had borrowed this beautiful book on making pincushions from my mum, so I had a go at making some... which led me to adapting ideas and creating a little trinket box. I have limited embroidery skills as I have not done it since primary school, so I have just been teaching myself and trying out some ideas. I find that ideas lead onto further ideas and more play. Some of the ideas work, and some don't.

Felt Heart Decoration

I cut out some basic heart shapes: 2 x same size, and 1 smaller heart; and some felt flowers and tiny circles for the centre of the flower.
I laid the smaller heart and felt flowers over the larger heart then sewed them on.
I then sandwiched a ribbon in between the two white heart pieces and sewed it together to finish.

Caravan

I saw the felt caravans on Pinterest. To make the caravans, I cut out two caravan shapes out of felt; a fabric rectangle for the door, and smaller squares/rectangles for the windows. I then traced around the top of the caravan to get the shape for the top piece, and cut out of fabric. I added ric rac for details, and a button for the wheel.  

Needlefelted Toadstools

I tried making miniature needlefelted toadstools in a macadamia nut shell. Still deciding on what to do with it. Perhaps it could go in an indoor fairy garden. 

Needlefelted Hearts

I just made basic needlefelted hearts (The Magic Onions have a wonderful easy tutorial on how to make needle felted hearts. which is how I learnt). I added tiny flowers to the hearts once I had finished. Flowers can be added by wrapping a tiny bit of wool roving around your little finger, pull off and stab into place. Get an even smaller piece of roving in a different colour; roll between your fingers to create a ball; and stab in the centre of your flower.

 Pincushions

I had some old teacups in the cupboard which are pretty but I never use; so I repurposed them with the help of a gorgeous book on making pincushions. I added ribbons, felt flowers and beads to decorate.


There was a felt pincushion in the book which was rather cute, so I had a go at making..


Trinket Box

After making the felt pincushion above, I wondered if I could adapt it to create a little box. This was a bit of trial and error and figuring things out as I went.
I haven't done embroidery in a very long time, but it was fun to pick it up again and decorate the little trinket box. 

I added a lid which was also embellished. The lid is sewn on so that it lifts up.


Kadinsky Inspired Pouches

By this time I was on a roll, and I wondered if it would be possible to make a little purse or pouch. I cut a rectangle of felt, and worked out where to put the embellishments.
I cut out a variety of circles of different sizes and colours, and layered them on top of each other, finishing with a bead. I then decided to cut out some leaf shapes, and sewed them on.
I folded the bottom part of the felt up, and sewed along the sides, leaving enough room at the top to be able to fold over like a purse. I did blanket stitch across all the edges and added a button and a loop of thread to close.
The front of the pouch
The back of the pouch.


Click on the link to see all my other craft tutorials


Click here to see all my Christmas related tutorials

Friday, 20 October 2017

Dramatic Play

One of the management team at the first centre I worked in had compiled all of her readings and research for each curriculum area into books for our centre. There was a book for each curriculum area, and they were required reading for all teachers. A good goal was to read one book a month. I used to read them in my lunch breaks. One of the curriculum books was on Dramatic Play, and before leaving I made a list of the different suggestions and ideas to promote dramatic play. I have since been doing much more reading and research on the importance of play - in particular, child-led play, without interrence or interruption from an adult - and how it develops Executive Function, which is a critical factor for success in school. Executive Function impacts on a child's ability to wait, to delay gratification, to be able to focus on their work knowing they will be able to go play later, to manage themselves and their behaviour, to problem solve, and to pay attention. Children need to be able to play, and to have plenty of unhurried, uninterrupted time in which to engage in play.

Setting up the environment to support them in their pursuit of play is part of the art and craft of the teacher. Below at some suggestions for props to set up various areas. They need not be expensive - many of these things may be found in op-shops or charity shops; garage sales; donated by parents; or, the source of many teachers classrooms - our homes.

Kitchen Props: some suggestions

Spice rack
Cups
Saucers
Timer
Clock
Ice cube trays
Vase
Tablecloth
Towels
Cloths
Iron
Ironing board
Rubber gloves
Duster
Dustpan & Brush
Broom
Kettle
Apron

Living Room

Sofa, Chairs, TV (Can be made from a cardboard box); Video; remote control
Magazine rack
Paintings
Ornaments
Flowers
Cushions
Newspapers
Telephone directory
Plants
TV guide
Books
Mirror
Address book
Catalogues
Puppets (for use with TV) - children can then make up their own TV progammes.

Bedroom

Beds or cots
Bed clothes
Dolls
Dolls clothes
Hats
Lengths of fabric
Clothes hangers
Dressing table
Mirror
Jewellery
Handbags
Shoes
Variety of scarves

Hospital

Doctor / nurse uniform
Rubber gloves
Beds, sheets, blankets
Plasters, bandages, cotton wool
Syringes
Thermometer
Old plaster casts
Scales
Waiting area - chairs, magazines, books
Telephone
Clipboards, paper, pencils
Reference books about the body
Posters / charts
Files
Doctors bag
Dolls
Medicine bottles, spoon, syringes, measuring cups
Stethoscope
Old x-Ray pictures
Crutches
Height measures
Measuring tape
Note pads / prescriptions
Get well soon cards
Vases, flowers
Appointment book


Travel Agent

Desk
Telephone
Clipboards, paper, pencils
Stamps, stamp pads
Posters: travel destinations, world maps, planes, boats, cruise ships. holiday posters
Catalogues and brochures
Maps
Passports
Postcards
Tickets
Suitcases / backpacks
Summer / winter clothes
Sunglasses
Bucket, spade, sun hats, rubber rings, beach ball, goggles, fishing net
Picnic rug, picnic set

Airport
Check in desk
X-ray machine (cardboard box with a black plastic bin liner glued over the top and cut into strips at each end)
Clipboards
Stamps and stamp pads
Boarding passes
Chairs set up in a row for the aeroplane
Magazines and books for reading while on plane
Trolley
Food, plates, cups, trays

Flower Shop

Flowers made by children using paper, card, cellophane, and found materials
Shop signs: Open/Closed; opening times
Dried flowers
Paper / silk / plastic flowers
Real flowers and plants
Oasis
Shopping baskets
Catalogues
Cards - large and small
Wrapping paper, scissors, Sellotape
Bucket
Plant sprayers
Ribbons
Cash register and money
Price lists
Telephone
Order book
Pens / pencils
Posters
Plastic vases
Flower pots
Pressed flowers

Post Office

Post box
Signs
Leaflets and forms: tax, passports, licence
Clipboards, paper, pencils
Cards
Stamps
Envelopes
Labels
Wrapping paper
Parcels
Scales
Telephone
Stamps and stamp pad
Till and money
Savings books
Mail bag
Maps
Foreign currency stamps
Phone
Sellotape
Scissors

Restaurant / Cafe / Takeaway

Name of cafe - signs, and opening times; open / closed sign
Tablecloth
Cups, plates, cutlery
Flowers
Recipe books
Menu
Cash register, money
Pictures of food
Blackboard for Daily Specials
Order pads or clipboards, paper and pencils
Napkins, placemats
Phone

Garden Centre

Seeds or seed packets
Bulbs
Herbs
Flower pots
Seed trays
Lolly sticks
Variety of flowers and plants made by children
Foliage
Tools: trowels, forks, spades, rakes
Watering cans
Lawn mower
Bird table
Logs
Water spray
Soil, compost, grow bags
Water feature
Garden furniture
Counter, till, money, phone
Gardening magazines and catalogues
Stories and reference books re gardening, growing, flowers and trees

Other Dramatic Play Ideas

Airport
Animal shelter
Aquarium
Art gallery
Artist studio
Astronaut / space ship
Bakery
Bank
Barnyard
Beach
Beauty shop
Bedroom
Birthday party
Bookstore
Bus
Campground
Candy shop
Car wash
Card shop
Castle
Cave
Chinese restaurant
Circus
Computer store
Gypsy caravan 
Dance studio
Dentist
Department store
Doctors
Drive through restaurant
Exercise studio
Factory
Fairytale land
Farm
Fast food restaurant
Film maker
Fix it shop
Fire station
Fishing
Florist
Garage / gas station
Garden
Gift shop
Gift wrapping
Grocery store
Hardware store
Holiday
Hospital
House
Ice cream truck
Library
Movie set
Movie theatre 
Museum
North Pole
Nursery rhyme
Ocean
Outer space
Palaeontologist
Park
Pet shop
Photographer
Picnic
Pirat ship
Pizza parlour
Police station
Post office
Puppet show
Radio show
Rainforest
Recycling centre
Restaurant
Safari
Santas workshop
School
School bus
Shoe repair or shoe shop
Tea party
TV station
Theatre
Toy store 
Train
Vacation / travel
Vet clinic
Wedding
Winter wonderland
Zoo

Wednesday, 6 September 2017

Heartfelt Ornament

This is a sweet little ornament that is easy to make, using two circles and one heart shape, which can embellished as much or as little as you like.


Click on the link to see all my other craft tutorials

Click here to see all my Christmas related tutorials

Saturday, 12 August 2017

Fairy Doors

I admit it, I have been rather enchanted with fairy doors at the moment.  There are so many sweet fairy doors around at craft markets and on Facebook. But I like to make things myself, and I am not much of a woodworker. So I sat down and played around with some ideas and scrap felt. I wondered if it was possible to create a fairy door from felt. I soon found came up with an answer: yes it is! And I am secretly very pleased with the results and can't wait to make a whole lot more!
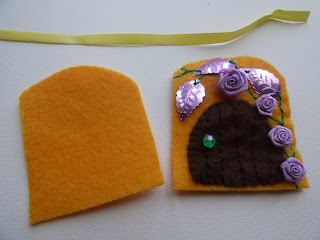
I drew various shapes for fairy doors and the background on paper, before cutting out of felt. It doesn't matter what shape you use - it can be uneven, round, or straight. You could even make a hobbit house shape. I just cut my felt shapes freehand, but if you like, you can make a template first. 


 If you want to create a panelled look on your fairy door, stitch lines on your door before sewing on a bead for the door handle.
 You will need to cut out one door, and two pieces of felt for the fairy house.
 You can use whatever you have on hand for embellishment... sequins, ribbon roses, flowers, beads....
 Position your door on one piece of the felt house, and sew into place.

I used two strands of green embroidery floss to embellish with. Stitch sequins and flowers firmly into place - I went over them a few times to make them secure.
If you want to be able to hang your fairy door, sandwich a loop of ribbon in between the two pieces of felt. Use blanket stitch around the edge of the house to sew the two pieces of felt together.


A Festive Fairy Door

I cut out two red shapes for the fairy house, and a white door. You can use whatever colour-way you wish - you could do a white house and a red door. 
If you want panelling on your door, stitch your lines using backstitch on your door first, before attaching it to the house.
I cut out a tree shape from green felt, and a trunk out of light brown felt. 
I folded a scrap of green felt in half to cut a circle, and then cut the middle out of it, to create the wreath. 
Lay your pieces out on one of your house pieces, and begin stitching. I added beads and sequins onto the tree and wreath as I stitched, and a bead for the doorknob. Stitch each bead and sequin through twice, to ensure they are securely fastened.

When you have finished the top layer of the fairy house, position it on top of the second piece of the fairy house, and sandwich a loop of ribbon in between.

Blanket stitch around the edge, securing the ribbon firmly. 


Click on the link to see all my other craft tutorials.

Click here to see all my Christmas related tutorials