Sunday, 30 August 2015

100 Days of Christmas Decorations - Paper Quilling

Paper quilling - it looks so pretty and delicate. It is a little fiddly to do, and quite time consuming. Make sure if you are using the dining table that you do not have to clear the table in a hurry for dinner, and give yourself a few hours to try this craft out for yourself.  You don't need all the fancy tools to have a go, but if you can get quilling paper (thin strips of paper) that certainly saves heaps of fiddling about trying to cut thin strips of paper the same width. 

 You will need:
Quilling paper (or thin strips of paper)
Glue. I find a good strong craft glue is better than PVA when quilling, as you only use a tiny bit of glue and you want it to hold.
Toothpicks or skewers
Scissors
Ruler
Tweezers


Cut your quilling paper into a variety of lengths.

I cut mine into 15cm, 10cm, 7cm, and 5cm lengths.  As I wanted to create a snowflake, I cut at least 6 of each length.

I find it easier to create and design through play, through manipulating shapes, rather than designing on paper in advance and then creating the shapes that I need.
To create shapes, wrap a length of quilling paper around a skewer. You can make a variety of different shapes depending on how you roll your paper.
Create spirals by wrapping a whole length around a skewer. I create spirals first then leave them to slowly unfurl before gluing them together.
Create scrolls by curling one end around the skewer, then the other end in the opposite direction; or curl each end in the same direction.
Try folding smaller lengths in half, then curl each end around the skewer.

When your spirals have unfurled a little, use the end of the skewer to dab a little bit of glue onto the end to hold it in place.
To create a teardrop shape: take a circular spiral, and squeeze one end to create a teardrop shape.
To create an eye shape: take a circular spiral, and squeeze at both ends to create an eye shape.

Once you have a variety of shapes in front of you, you can start playing around with them, putting them together to create different designs. Once you have created a design you are happy with, use the skewer to dab a little glue on the bits that touch. Press together.

Let dry. I try to place it on a plastic lid to dry so that it doesn't stick - if you leave it on paper to dry, the glue may stick to the paper underneath.

100 Days of Christmas - Christmas Pudding paper & card ornament

Here is a simple but effective paper & card ornament that you can make with children.

You will need:
scrap cardboard to make a template - empty cereal packets or old calendars are ideal.
brown card
green card
white paper
red paper
PVA glue
glitter (optional)
pencil
cup
scissors

1.  Draw around a cup x 2 onto scrap card . Cut out. One circle is your pudding template. On the other circle, draw a wobbly line to make the icing.  Cut out. This is your 'icing' template. Draw a holly leaf shape onto scrap card to create a holly template.

2. Draw around your pudding template onto brown card. Cut out.

3. Draw around your icing template onto white paper. Cut out.

4. Glue icing onto pudding.

5. Draw around your holly template onto green card x 2. Cut out.

6. Cut out a little circle of red paper. This is your berry. Arrange holly leaves and the berry onto your pudding, and glue into place.

7. If you are using glitter, apply glue to holly leaf in desired shape and sprinkle with glitter. Tip excess glitter onto a sheet of paper. Fold paper in half and tap excess glitter back into bottle.

8. Thread a piece of string through the top for hanging.

100 Days of Christmas - felt stocking ornaments

These cute little stocking ornaments are suitable for children aged 7+ to create, especially if they have already been introduced to simple sewing.

You will need:
acetate or scrap cardboard to create a stocking pattern to trace around
felt
pencil
scissors
needle
thread
sequins, beads or buttons to decorate
safety pin or pins
ribbon for hanging

NB: If you are using small beads, you will need to use a small needle that can fit through the beads.

Draw a stocking shape on acetate or card.  Cut out. This is your stencil.

Fold your felt in half, Place the stocking stencil on the felt and draw around lightly in pencil. Use the safety pin or pins to fasten the two sides of the felt together.  Cut out the stocking shape - you should now have two stocking pieces.

Thread your needle and tie a knot in one end. Thread through one of the stockings, and begin attaching beads, sequins and buttons to it. When you have decorated it as much or as little as you like, place on top of the other stocking shape (right side facing up).  Match up the edges, and use a simple overhand stitch around the sides to join it together. I decided to leave the top free, so that I could put something into it if I wished.

When finished, attach a loop of ribbon to hang it up with.

Feel free to post photos of your stockings - I love to see what other people create!

Sunday, 23 August 2015

100 Days of Christmas: Paper and Card decorations... Gingerbread Men


 Gingerbread Men are a quintessential Christmas motif.  These Gingerbread men are sure to bring joy to your Christmas tree, and are easy enough for the children to make.


Create a basic gingerbread man template - I used acetate, but cardboard works well too (especially old cereal packets).


You will need:
Gingerbread man template
Card (I used 285gsm but any card will do)
Selection of Christmas papers
PVA glue
Scissors
Buttons

Trace around your gingerbread man onto card, and cut out.

Trace around your gingerbread man onto Christmas paper, and cut out.  Cut x 2 - one for the back, one for the front.

Glue the christmas paper onto your gingerbread man. Trim with scissors to fit.

Glue buttons down the front of your gingerbread man.

I used a variety of papers for the front of my gingerbread men, and one solid piece of paper for the backs.  To use a variety of papers, it pays to do them all at once.  Cut 3-4 gingerbread men out of card, then 3-4 gingerbread men out of different christmas papers.
Stack the papers on top of each other, and cut into 3-4 pieces.  Swap the pieces around to create a pleasing design, and glue onto your base.
Glue your buttons on.

Make a small hole at the top and thread a piece of yarn through, for hanging.

Saturday, 22 August 2015

100 Days of Christmas: Paper and Card decorations... a winter house


I love paper and card, and have a huge stash of it in my craft room.  One of the things about this 100 Days project is that I want to use up what I have got, rather than buy more stuff. For my paper and card decorations, I began by making templates on acetate.  Once you have templates, most of the hardwork is done, and all you have to do from there is cut and paste. When making my templates, I went through a variety of Quilting and Sewing magazines (Christmas issues) to find suitable patterns and pictures to use, and traced over them.


 I find that once you start creating, you start thinking of other things you can do.  With the first house I made, I glued transparent paper onto the card for the windows.

 But then I thought, if I cut out the windows and used the transparent paper in the windows, then the fairy lights will shine through the windows and light up the house.


You will need:
Card (I used 285gsm card)
Paper (I used a sparkly white paper for the roof and chimney; yellow transparent paper for the windows; and handmade red/brown paper for the house
PVA glue
craft knife
scissors
house template


Draw around the house template on the card.  I folded the card in half along the base, and then drew and cut out the house shape.


Draw a window in the middle of the house, and cut out using a craft knife.


Cut a piece of transparent paper to fit easily over the window.  Make sure it overlaps the window - be generous.  Spread glue over one side of the house, and place transparent paper over the window.


Spread glue over the overlapping transparent paper, and press the other side of the house down, to encase the window.


Fold the red/brown paper in half, trace around the house shape onto the paper.  Cut out.  Place over the top of the house, and hold up to the light to see where the window is - use a pencil to lightly draw around the edge of the window. Use a craft knife to cut out the window.

Glue both sides of the house shape onto the house.


Trace the roof shape and the chimney top onto the white paper x2.  Cut out, and glue onto the roof.  Trim the paper to fit the house.

When dry, make a hole and thread a piece of string through to hang up.


100 Days of Christmas ... Bunting

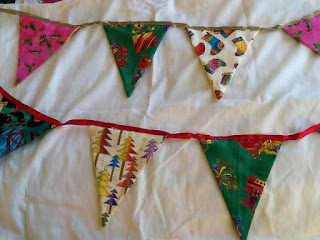
Following on from my star garland, I still had lots of beautiful Christmas fabric left over.  I wanted a way to showcase them - which bunting does beautifully.

You will need:
Fabric
Backing Fabric
Thread
Wide Ribbon

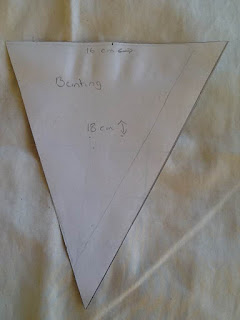
First I created a triangle template on an old calendar. I tried several sizes, and decided on 16cm across and 18cm long.  I didn't want them to be too big or too small.
  

I traced the template onto the fabric and backing fabric, and cut them out.  I pinned the two fabrics together, and sewed the two sides together, leaving the top unsewn.  I turned them out the right way, and ironed them flat.


I then folded the ribbon in half lengthwise and ironed it to make a sharp crease along the middle.  I pinned the bunting to the ribbon, with the ribbon encasing the raw edge of the bunting.

I sewed along the edge of the ribbon, catching the raw edges of the bunting inside the ribbon. I created a small loop at each end of the ribbon to hang up easily.

100 Days of Christmas... a beaded star garland

For the last two years, I have participated in the 100 Days Project.  In fact, that is how Needle Felted Fairytales came about - because for my first 100 Days Project, I decided to needlefelt something every day for 100 days.  This year, it was meant to kick off in July, but due to website delays, it hasn't started yet - so I am doing it anyway.  Last year I wrote a children's book; this year I am doing 100 Days of Christmas, because I love Christmas, and every one of my Christmas decorations is handmade. Each year I take part in a Christmas Decoration swap, and last year I found that by the time I had finished my 100 Days Project, I didn't have much time to make decorations.  So this year, I should be sorted!

My first decoration is a Christmas star garland.  I have had these beautiful Christmas fabrics sitting in my fabric box for the past few years, unsure of what to do with them.  I came up with this project to help showcase these beautiful fabrics.

You will need:
Fabric and backing fabric
Thread
Filling
Buttons
Beads

I made a star template on a scrap piece of card (empty cereal boxes are great for making templates), and drew around it onto the fabrics (and also onto a backing fabric).  I sewed them together, leaving a gap to stuff with a little bit of filling. Don't overfill them. (I used a sewing machine to sew the stars together, but you could also handsew them too).


I then sewed up the gap, and topped the star with a button in the middle.


After making a number of stars, I brought out my stash of beads, and began to join the stars together with beads, using a needle and thread.  This was the fun part! This is a great way to use those beads that you don't know what to do with.

You could make this garland using any basic shape, such as hearts, or circles.  You could alternate the stars with hearts, or make a garland with just hearts, which could then be used on Valentines Day, birthdays, and Easter.