Pages

Friday, 21 December 2018

Harry Potter themed Journal


 My 9 year old niece loves all things magic! She is an expert on Harry Potter, Worst Witch, Unicorns, Pegagus and anything else magical and mystical. I wanted to make something for her that would encourage her to  engage in her own learning about different aspects of magic and the natural earth. I wanted to make her a journal that would be her own space for writing, drawing, and creating. I made it with the hope of enticing her away from TV and computer screens, and to give her opportunities to connect with nature. I bought a plain A5 spiral visual diary for $2.50, and a pack of metallic card for $4, and set to work transforming it into a book of magical learning.


I covered the front and back covers with magical themed card, and got out my chalk pastels to colour random pages to make them look old.

I printed off some things to do with Harry Potter, such as a list of required equipment for first years; spells; quotes, etc, and pasted them in throughout the book.


 I have written headings on some of the pages, to inspire my niece to undertake research and learn more about different aspects of magic, such as properties of herbs and plants; properties of stones; psychology of colours; phases of the moon; and star constellations.

There are plenty of pages for Miss 9 to write and draw in, to engage in creative writing, make up her own spells and potions, or to use as a diary; jot down notes; to draw from observation; or whatever.

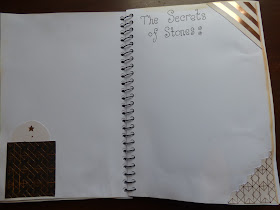


There are a number of different things to learn about as you go through the book, such as sacred geometry and mindfulness; the planets; potions; and spells.

There are pockets throughout the book with little tags in them. Some of the cards are blank, for Skylar to write notes on, while other cards have things written on, such as mindful exercises, or prompts to do things, eg. to connect with nature through activities such as creating a herb garden.
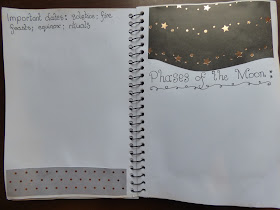


There is plenty of room for Miss 9's creative writing, poetry, and to jot down notes, ideas, and interesting facts and information that she comes across.

To see my other craft posts and tutorials, Click on the link here.

Christmas Table Decorations

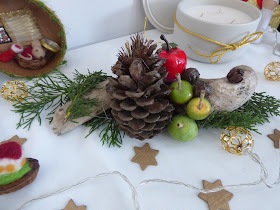
Making your own Christmas table decorations is a super effective way of bringing a bit of festivity to your home. By using natural resources, any broken ornaments that you may have, and a few items picked up at a charity shop, you can create fabulous table decorations. I found that once I started, I couldn't bring myself to stop until I had used up two whole packs of hot glue sticks.

You will need:
Hot glue gun
Hot glue sticks
Broken ornaments

Natural Resources:
Use whatever you can find in your environment. I used:
Pinecones
Acorns
Driftwood
Conifer leaves and seed pods
Bark
Apples that had been blown off the apple tree
Spray of red berries from the garden


Lay out some newspaper or large sheet of card to work on, to protect your worksurface from glue.

Begin by laying out your materials. Start with a central item, such as a pinecone, a large ornament or a piece of driftwood, and begin placing smaller items around it and glue into place. You might like to start playing around with placement of items before starting to glue them together, to create pleasing arrangements.

Hot glue is easy to pull apart when cooled, so don't worry if you decide you don't like something - you can always pull it back off and start again.
Start off with two items, applying glue to the point where they touch.
Build up by surrounding your central items with a range of materials, filling up gaps with small items such as seed pods, acorns and berries. These berries, apples, ornaments and leaves are a perfect complement for a red, green and gold colour theme. 


 I found it easier to add the conifer leaves last, and to hot glue them to the bottom of the arrangements.

 This arrangement above uses a plastic lid as the base, with everything glued onto the lid.
 A large broken ornament is the centre of this arrangement, with windblown apples, fake apples, seed pods and conifer leaves glued around it.
 Conifer leaves form the base of this arrangement to create a full look, with a range of broken ornaments and natural resources glued on top,

 A range of broken ornaments were glued together to form a base, with small berries, seed pods and tiny apples filling up any gaps. Conifer leaves with seed pods were glued underneath the ornaments.
 This arrangement uses bark, apples, small conifer leaves and tiny seedpods to fill up the gaps.
Have fun creating your own table arrangements - there is no right or wrong way. I hope these ideas help to inspire you to reuse your broken ornaments in new ways, and to create your own stunning displays as you celebrate Christmas with your friends and families.

If you are interested in checking out my other Christmas crafts and tutorials, please click on this link here.

If you would like to check out my other craft tutorials, please click on this link here.

Miniature Felted Christmas Scenes


While I was felting miniature Christmas scenes in walnut shells recently, (see my post here to find out how to make these cute little Christmas trees in walnut shells) I decided to try making a tiny wee mouse asleep in a walnut shell, waiting for Santa.

If you are new to needlefelting, check out this earlier post here, which gives you a bit more detailed information on how to felt and what you need.

This was a project where I began to have doubts as I was felting the mouse, whether I had made him too big for the walnut shell. However, as mentioned in my last post, there is a big transformation that takes place as you continue to stab the wool and the fibres begin to felt firmly together, causing significant shrinkage, which was exactly what I needed for him to fit. The mouse took quite a bit of time to make, but finally I was able to tuck the mouse into the walnut shell, wrap him with a bit of wool roving for a blanket, added a tail, and began to think about the best way to make a Santa Stocking.
I decided to needlefelt a stocking, so I began by pulling off a small strand of red roving, rolled it into a cylindrical shape, and began stabbing. Both the mouse and the stocking took quite a bit of time to make, as they needed to be firmly felted to create the required shape and size. I had to be patient and persevere to see both the stocking and mouse take shape. I then attached the finished stocking to the bed with a needle and thread.
The next day I decided to needlefelt a kiwi asleep in a walnut shell bed. The kiwi was much easier to make than the mouse, and just required making one very small ball and one slightly larger ball (for the head and body); and a small piece of yellow roving which I rolled vigorously between my fingers to make a small sausage shape for the beak, before stabbing lightly to felt it into shape. I tucked Kiwi into his walnut shell bed, and stabbed his head, beak and body into place. I wrapped a bit of coloured roving over him for his blanket, and made a tiny pillow for under his head.

I also made Kiwi a Santa Stocking, again attaching it through his blanket with a needle and thread.
I had bought salad from the supermarket for my lunch during the week, which came in these wonderful cardboard containers. I was reluctant to throw them away, and instead used them to create these mini Christmas diorama scenes for Mouse and Kiwi.
I kept Mouse's little room plain, with just a few little adornments to make it homely. The clock is cut from a bottle cap and attached to the side of the wall. I cut out a little window in the back of the container and covered it a ribbon curtain; and drew a little family photo for Mouse to put on his wall. I edged the container with a bit of green eyelash yarn to resemble grass.

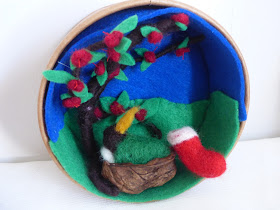
Kiwi's scene is created from acrylic felt. I drew around the cardboard container onto green and blue felt, to get the size, and cut out. I cut the green circle in half (do not cut in a straight line - create a wavy line to resemble a hilly background), and sewed the green grass onto the sky. I then measured the depth of the container and cut two strips, one green and one blue, to cover the sides of the salad bowl, sewing the strips to the circular background and connecting them to each other.


The pohutukawa tree is made from three pipecleaners twisted together, and wrapped tightly with brown roving. I cut out tiny leaf shapes from the green felt and tied them to the branches with a bit of thread. The pohutukawa flowers were made from rolling a few thin strands of red roving between my fingers to create a tiny ball, felting it with a needle to hold it shape, and used thread to run through the middle of the flower to stitch to the leaves. The pohutukawa tree has roots to help hold it upright, which are stitched onto the grass to secure it; while the branches twist upwards and out.
 To see all my other Christmas tutorials and posts, please click on the link.
To see all my other craft posts, click on this link here.

Needle felted walnut shells

Christmas time is such a magical time of year for me, and I love to decorate and make my home look a bit special. This year I have shifted cities and am currently staying at my parents while I find somewhere to live. All my Christmas decorations are in storage, so I have been busy creating decorations to create a little festive display in my room.
All my craft supplies are also in storage, however I discovered a wonderful little sewing shop which has a fantastic range of wool roving. I felt like a kid in a candy shop as I chose colour after colour, and couldn't wait to come home and start felting.

If you are new to needlefelting, check out my earlier tutorial on needlefelting here, which gives you a bit of information on how to needlefelt, and what you will need.
A while ago on Pinterest I came across thes amazing miniature felted scenes in walnut shells. I wasn't convinced I could do them, but mum and dad had walnut shells around their garden, so I thought I would give it a go, although on a less elaborate and less detailed scale.
I began by soaking the walnut shells in boiling water, then dried them out in the oven on low, to clean them. The walnut shells made the kitchen smell quite strongly, so I had to open windows and doors to air it out!

I had sketched out a few ideas on paper before starting. I like putting my ideas on paper as this helps me to clarify ideas, work through any problems, figure out the best way to do it, and it also allows me to generate further ideas. I always keep a little notebook and pen in my bag, so whenever I have to wait somewhere, whether it is at the doctor's or at the Fish & Chip shop, I get out my notepad and begin sketching and writing down ideas.
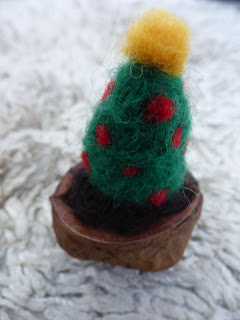
When the walnut shells had cooled down, I began. I rolled up a small length of wool roving and pressed it into the walnut shell for the base. I then pulled off a small length of green wool and rolled it up into a cylinder shape. I tried to make it conical but it was more cylindrical. However, this can be fixed once you begin felting, by felting firmly around the top to shrink it, and by adding more wool around the bottom to add shape. I started stabbing the wool in place, and once it was at a stage where it could start to hold its shape, I began to sculpt a more conical shape with my felting needle*. I then rolled up single strands of coloured roving between my thumb and forefinger to create tiny balls which I stabbed into place around the tree**.

The second tree I made, had to be able to stand up in a lopsided walnut shell, so I had to make sure that I had the angles right for it to be upright in an angled base. To decorate this tree, I wrapped a thin strand of yellow roving around and around the tree from the top to the base, and stabbed it into place with my felting needle.
When I was happy with my tree, I felted it thoroughly into the woolly base in the walnut shell, being careful not to damage the needle on the hard shell.
*When needle felting, the more you stab and felt the wool, the more your item begins to shrink and firms up. This is because the felting needle has barbs on it which grabs the natural hooks in the wool and brings the fibres together. The more you stab it with your needle, the more tightly the fibres mesh together. This is why there is always shrinkage when felting. Quite often when felting, I find that my finished product looks nothing like it did when I began, and it is easy to have a moment or two of doubt during the early stages about your project and a dreaded feeling that it is not working. Just keep going, keep stabbing, and have faith that it will turn out how you want it to. Felting needles are wonderful sculpting tools that can transform wool into whatever your imagination can dream up. You just need to persevere and have faith throughout the early formation period.
**If you want to add more wool to your item, make sure you add it while the fibres are still loose. I find that I am unable to attach wool to objects that have been felted too much; this is the case whether I am adding shapes such as arms; details such as hair and eyes; or extra roving for more shape and thickness. Keep fibres loosely felted where you will be adding to it. Once you have attached all your details, then you can begin stabbing your project firmly into shape.
To see more of my Christmas related crafts and tutorials, please click on the link here.

To see my other craft posts and tutorials, please click on this link here.