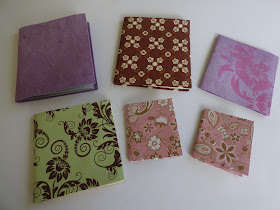
It has been some time since I have made books. I tend to go through phases of craft making - I delve into one type of craft such as card making, and then move onto something else. But I spent a lovely weekend making little journals, in an effort to use up my excessive stash of paper, and got hooked on bookmaking again.
This is a fantastic resource with pictures and clear instructions on how to make a whole variety of books, from simple booklets to albums, with a wide range of binding. It also offers inspiration and possibilities for what format books can take. This book taught me how to make photo albums and travel journals, which made wonderful Christmas gifts to family and friends.

After making some small journals, I began making larger journals, and even leather bound journals with several signatures.
A leather bound journal.
I began with making these little books. They were simply made from four rectangular sheets of paper folded in half for the insert, and a piece of card the same size.I covered the card cover with decorative paper.
Fold the paper for the inside of the book in half.
Use a ruler and pencil to mark 3 dots, evenly spaced, for binding.
Using a push pin (or tack), make a hole with the pin through all 4 layers of the paper.
Thread a needle with strong cotton. Start at the back and thread the cotton through the holes to bind the pages together.
Knot the ends of the cotton together at the back.
Place the paper signature inside the journal cover. Glue the front and back pages of the signature to the inside of the cover.
Use a push pin to push through the layers of the paper to create holes, ready for binding with needle and thread. Depending on the size of the paper, make 3-5 holes, to ensure stability and keep the pages secure.
This journal was made in the same way, with a single cardboard cover, covered with decorative paper.
This blue journal was made with slightly larger paper, and I needed to use two separate sheets of card cut to size for the front and back covers. The sheets of card were covered with decorative paper, and a strip of paper glued between the two covers to join them.
The signature (the inside pages) were bound with needle and thread, and the front and back pages glued to the inside of the covers.
This was another journal made from two separate pieces of card for the front and back covers, and joined with a long strip of paper for the spine.
 This leather bound journal had two signatures which were tied together, before gluing the page ends to the covers. A strip of leather was cut wide enough to allow for the two signatures, as well as for an overlap of the front and back covers. I used PVA glue which worked fine with the leather.

These little books were made from four heart shapes cut from card, and joined together with a split pin, or brad. The pages open up like a flower and close into a heart shape.

This raindrop book was an experiment. I created a raindrop shaped cover from two pieces of card with tape around the edge, to keep the book safe.
I created a raindrop template and cut it out on blue paper.
I made a hole on the top and bottom of each raindrop.
The front and back covers, which were made from dark blue card, were tied together on the side.
I threaded blue yarn between each raindrop to attach them together.
When you pick up the book, or hold it up, it is meant to look like raindrops falling.
The raindrops fold back up to fit inside the little pocket.


Neat
ReplyDelete