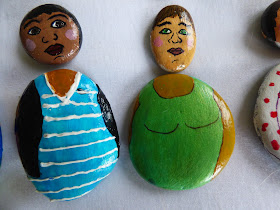
These stone people are so much fun to play with. These stones were inspired by a post shared on Facebook about an artist who had created mix and match stone faces and bodies. So I decided to create some to take to school. I used to love those wire-bound picture books that had heads, bodies and legs which you mixed and matched and created funny people! I wanted to include some fun faces and also raise awareness of other cultures and dress codes, such as wearing headscarves.
I went to Napier for a few days holiday, and found that the beaches were full of stones! Beautiful, smooth, round stones. So I collected some (well, filled up a bag to be honest) and brought them home.
Where to begin? I began by painting all the stones white, using white acrylic paint.
Then once dry, I painted the small stones with a flesh colour. I used artists acrylic paint which I have had sitting around for a few years (unfortunately some of my tubes of paint had dried out over the years of neglect). I put dabs of white, yellow, brown and red paint on a plastic lid (plastic lids from food containers are fantastic to use as paint palettes), and began mixing various skin tones to reflect the many different skin colours in our world/country.
For the bodies, I looked at photos of my friends and family to see what they were wearing. I browsed Facebook photos, family photos, and old photo albums for reference. I drew a whole lot of stone shapes on a sheet of paper and practiced drawing clothes on them. When I was happy with it, I used a sharpie pen to draw the outfits on the bodies, before painting them.
I left the faces last to do, as I find faces difficult.
Again, I drew a whole lot of circle shapes on a piece of paper and practiced drawing faces on them. I browsed photos, Facebook, and also did internet searches for particular images, such as of people wearing a headscarf, motorcycle helmets, and Stormtroopers.
I started by using a fine Sharpie pen to draw in the face and hair. I did a few faces at a time, and painted the hair in first, and let that lot dry while I began drawing faces on another 5 stones. I also used the hair colours to paint details such as mustaches and beards. Then I painted the whites of the eyes, and let dry, before painting the iris. When dry, I used a fine Sharpie to put in the pupil, outline the eye, and touch up or thicken the eyebrows.
To create the lip colours, I dabbed white, red, and a little brown onto my palette and mixed up lip colours to match the skintones. I added white to the lip colours to create the cheek colours.
When dry, I gave them all a coat of clear nail polish to protect them.


No comments:
Post a Comment