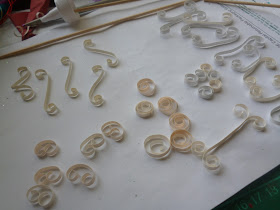
Paper quilling - it looks so pretty and delicate. It is a little fiddly to do, and quite time consuming. Make sure if you are using the dining table that you do not have to clear the table in a hurry for dinner, and give yourself a few hours to try this craft out for yourself. You don't need all the fancy tools to have a go, but if you can get quilling paper (thin strips of paper) that certainly saves heaps of fiddling about trying to cut thin strips of paper the same width.
Quilling paper (or thin strips of paper)
Glue. I find a good strong craft glue is better than PVA when quilling, as you only use a tiny bit of glue and you want it to hold.
Toothpicks or skewers
Scissors
Ruler
Tweezers
Cut your quilling paper into a variety of lengths.
I cut mine into 15cm, 10cm, 7cm, and 5cm lengths. As I wanted to create a snowflake, I cut at least 6 of each length.
I find it easier to create and design through play, through manipulating shapes, rather than designing on paper in advance and then creating the shapes that I need.
To create shapes, wrap a length of quilling paper around a skewer. You can make a variety of different shapes depending on how you roll your paper.
Create spirals by wrapping a whole length around a skewer. I create spirals first then leave them to slowly unfurl before gluing them together.
Create scrolls by curling one end around the skewer, then the other end in the opposite direction; or curl each end in the same direction.
Try folding smaller lengths in half, then curl each end around the skewer.
When your spirals have unfurled a little, use the end of the skewer to dab a little bit of glue onto the end to hold it in place.
To create a teardrop shape: take a circular spiral, and squeeze one end to create a teardrop shape.
To create an eye shape: take a circular spiral, and squeeze at both ends to create an eye shape.
Once you have a variety of shapes in front of you, you can start playing around with them, putting them together to create different designs. Once you have created a design you are happy with, use the skewer to dab a little glue on the bits that touch. Press together.
Let dry. I try to place it on a plastic lid to dry so that it doesn't stick - if you leave it on paper to dry, the glue may stick to the paper underneath.


No comments:
Post a Comment