I realised this year, in my 8th year of teaching as Matariki came around once again, that I did not have any solid Matariki resources to draw upon, to help me with my planning for Matariki. I decided to change this, and created a little book where I wrote in information all about Matariki for me to use each year. You can see how to make these journals by clicking on the link Journals To Make.
I took a lot of my information from Te Papa's amazing blog that is full of wonderful stories and ideas for what to do relating to each star in the Matariki cluster. Do take a look at their blog here Te Papa Matariki Education Resource.
But the blog only covers the 7 stars - and there are actually 9 stars. I used information from both Te Papa and Te Wananga o Aotearoa to create stars that depict what each star relates to.
Matariki is the star connected with whanau, or family, and the coming together of people. It is connected to our well-being, and our connection to the land.
I have two conflicting sources of information for Waiti. According to Te Papa's information, Waiti and Waita are connected to invertebrates. But according to Te Wananga o Aotearoa, Waiti is connected to freshwater sources and the creatures that live in them. I have illustrated Waiti with invertebrates, because many of them, such as dragonflies, require a freshwater source for their pupae, and live around fresh water.
 According to Te Wananga o Aotearoa, Waita is connected to the oceans and all the creatures in it. This is different to Te Papa's information, which suggested it is connected to invertebrates also, as Waiti and Waita are twins. Tamariki have been picking up rubbish and we have been talking about how so much rubbish ends up in our oceans, and we need to protect them.
Waipuna-a-rangi is the star connected to the rain.
We made ice, which was lots of fun to explore, as one block was not fully frozen inside, and we could see bubbles within. It happened to hail outside, so we investigated the hail and picked it up in our hands, and read books about weather patterns, rain, and how hail was formed. We also put on raincoats to run in the rain and filled up buckets and containers with the rain.
Tupu-a-nuku is the star that is connected to plants, especially those that provide food, clothing, and medicine.
We have been weeding the garden, picking oranges from our tree and cutting them up to eat for morning tea; and making vegetable soup.
We have also been learning to weave flax and paper.
Tupu-a-rangi is the star connected to the forests and the birds.
I made a bird feeder with the children, to feed the wild birds in the winter time, to look after them. We have also been learning about our native birds through stories such as Little Kiwi's Matariki; A Booming in the night; How Kiwi lost his wings; and finger puppets.
Ururangi is the youngest child of Matariki, and is the star that is connected to the 4 winds - Hauraro (north wind); Tonga (south wind); Hauauru (west wind); and Marangai (east wind).
We have been making kites and windmills to celebrate Ururangi.
Hiwa-i-te-rangi is the star connected to our hopes and dreams.
 Pohutukawa is the star connected to the memories of loved ones who have passed on. I love that this star is called Pohutukawa and that she is connected to our tupuna, as it is so fitting. The Maori believe that when someone dies, their spirit makes their way to Cape Reinga, at the top of the North Island, which is also known as "The leaping place of spirits". There is an old pohutukawa tree right on the very edge of the cliff, and the spirit climbs down the roots to Hine-nui-te-po, the atua of the darkness, who takes them to their final resting place. What is significant about this pohutukawa tree, is that it has never, ever flowered.
 Other things we have been doing with the tamariki are wrapping wool around popsicle stick stars. I prepared them the night before with a dab of glue in the middle of each stick, and tied a bit of wool to each star, ready for children to begin wrapping.
Our teachers and tamariki have been learning to sing "Tirama tirama nga whetu" (Twinkle twinkle little star):
Each day the tamariki have been acting out a Maori legend or Matariki story. I created headbands for each atua, and the children wear them as they tell the story of Ranginui and Papatuanuku; or the 7 fishes of Matariki. We have been using finger puppets to tell the story of Little Kiwi's Matariki, which is a lovely picture book. I have been taking photos of the children as they act out the stories, and then using the photos to create our own versions of the stories to read and retell.
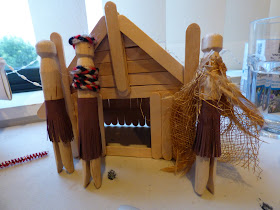
As part of our Matariki celebrations, I have been telling the story of Te Waka o Tamarereti (The Waka of Tamarereti). To create a display for this story, I wanted to make a wharenui. After a bit of contemplation on how best to do it, I settled for making it with craft sticks.
The Wharenui
You will need:
A pack of long craft sticks
A pack of short craft sticks
Good craft glue
I began with making the roof - you need to make two sides. I laid 6 long craft sticks next to each other and glued two short sticks across them to hold them together.
I then glued a long craft stick along the edge of the sides of the roof.
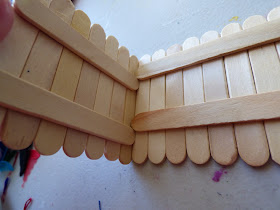
Next came the walls... two short sides and one long side for the back. I lay the sticks next to each other and then glue 2 sticks crosswise to hold them together.
When sticking the lengthwise sticks on, make sure that they are at a different height to the next side so that when you put the two sides together, they fit.
Glue the 3 sides together.
To make the front, you need to make two short sides to create a doorway. I laid 4 short sticks next to each other and cut a short stick in half, which I glued across them. Again, make sure that the lengthwise sticks are at a different height to the lengthwise sticks on the sides of the whare, so that the two sides fit together.
Glue the front sides on. I glued a long stick across the top and bottom to secure them, and also create the doorway.
Now for the roof... I wanted to fill in the top part of the roof. To do this, I laid the roof sections on a piece of paper and drew the angles down on the paper.
I then lay my craft sticks down on the triangle to fit, and drew the roof outline on them.
You need to do this twice, for the front and the back of the whare.
I glued a short stick across them in the centre, to secure them.
Secure them to the front and back of the whare with glue.
I put glue along all the edges and then put the sides of the roof on top. I also added a beam across the middle, right in the centre, to help secure the two sides.
Add long sticks to the front of the wharenui and a short stick to the top, for the tekoteko.
You could draw carvings on them before gluing, but I decided to leave mine plain.
The Waka
This was simply made with one long craft stick in the middle, and two long craft sticks glued together for each side. I used one whole short stick for the back of the waka, and cut a short stick in half for the front of the waka.
Peg People
I used wooden pegs to make people for my wharenui. I didn't give them arms or faces - just kept them really simple.
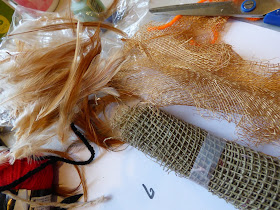
To make a cloak, I used some mesh ribbon and cut a small rectangle to use as the cloak, and pushed feathers through the top around the edge. I secured the cloak with glue.
To make a wahine, I plaited some wool and wrapped it around her body, securing it with glue.
To make a grass skirt, I cut a small rectangle of paper, and cut slits across the length of it.
Put glue across the top of the skirt.
Wrap the skirt around the body for both the wahine and the men.
Some other ideas I did for Matariki...
Stars frozen in ice with a bit of blue glitter. These were star shaped ice cube things that you freeze and put into your drink - I picked them up on special for $2 a bag. I cut up washed milk cartons as the mold, and put 7 stars into each container, to resemble the Matariki constellation. Although in actual fact I have just learnt that there really are 9 stars in Matariki.
Weaving
I made two weaving looms from branches... the above one is four branches lashed together, while the bottom one uses a forked branch. I wrapped string around the branches for the warp to weave grasses and ribbons through.
Natural Resources
I try as much as possible to weave mathematics and literacy in throughout our day, and one way of doing this is by having it available and set up on tables for a table top activity. The above activity is simply a pile of sticks and a povocation to put in order from shortest to biggest, although children can do whatever they want with them, and they usually find other ways to use them that I had not thought of.
Once we had defrosted the stars, I left them available to play with on the numeracy/literacy table, so children could sort them, make them into patterns, count them, pick them up with tweezers, transport them, put them onto a dark background to make their own star constellations, etc etc.
Felt Stars
I created these stars out of felt, to go with the story The Waka of Tamarereti. I decorated them with a tube of glitter glue. I made 9 stars, as I have just learnt that there are actually 9 stars in the constellation of Matariki, and each one has a different pattern, as each star represents a different aspect of life.Some other things we have been doing to celebrate Matariki...
We painted a large cardboard waka to create Tamarereti's Waka
Weaving paper stars
Making Maori bread
Telling Maori myth and legends
Acting out the stories
Making and flying kites
Weeding the garden
Making poi (you can find instructions on how to make poi and do the four plait here.)
Learning waiata (I have made a previous post on some of the waiata we sing here.)
Singing the Matariki Macarena....
Matariki Macarena
Waiti, Waita
Waipunarangi
Tupuanuku
Tupuarangi
Ko Ururangi
Te potiki o te whanau Matariki.
Do the actions as for the Macarena as you sing it; when you get to the end of the verse, jump 90 degrees to the right and do it again. Keep going until you are facing the way you started.
The words are the names of the stars, but 'Ko Ururangi te potiki o te whanau Matariki' means 'and Ururangi is the youngest of Matariki's family'.


