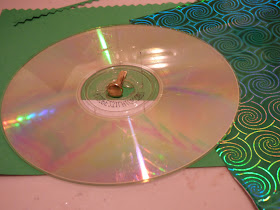
Spinning Disk
There is a young boy in my centre who has a deepseated fascination with spinning things. He spins plates, lids, anything round; if I have a bowl of crayons or acorns set up on the table, he tips them out and begins to spin it. So to help direct his engagement and also provide him with further experiences, the children in my class and I have begun making things that spin and roll and turn. It has been lots of fun, and the older children have also begun to find enjoyment in spinning things.
This spinner pictured above is simple to make, with an old CD, a paper fastener (also known as a split pin, or brad), sellotape, glue and decorative paper.
Place the sellotape over the middle of the CD, to close up the hole. Put tape over the hole on bothside of the CD.
If you are covering the CD in decorative paper, cut it to fit and glue onto one side of the CD.
You might like to just glue on half a circle, to be able to see the effects it makes when spinning.
Using a craft knife, poke a small hole in the centre of the CD.
Push the paper fastener through, and bend the two sides down to fit snugly on the CD (see top picture).
Turn over so the head of the paper fastener is face down on the table, and spin!
Other things you can experiment with to explore spinning, rolling and rotating:
Tape two old CD's (or large, round plastic lids) to either end of a cardboard tube to roll it.
Paper Copters
This experiment was an extension of our interest in Transport. You can check out some other ideas I did for our Transport theme here.These paper copters (or Twirly-Whirlies, as I call them) are super simple to make, and help to develop children's cutting skills (bonus!) as well as being heaps of fun to fly.
You will need:
Paper
Paper clip, or clothes peg, or stapler.
Pencil
Scissors
Cut your paper into strips. I started using A5 sized paper which I then cut lengthwise. Experiment using different sizes of paper, different weights (eg tissue paper, crepe paper, card, wrapping paper, etc), and different patterns. You might like to draw patterns on your plain paper.
Fold your strip of paper in half lengthwise, and in half widthways. Draw a line going down the centre of your paper, to the middle.
Draw two smaller, horizontal lines going towards the centre. DO NOT CUT RIGHT THROUGH!
Cut along these lines with scissors.
Fold the excess paper into the centre.
Make a small fold at the bottom, fold up and secure with a paper clip. You could experiment and try this with clothes pegs if you don't have any paperclips.
Fold one of the top flaps down towards you, and fold the other top flap down away from you.
Hold up high in the air and let go!
If you have stairs, stand at the top of the stairs and watch as they spin to the ground. If you have a balcony, let them go off the balcony and watch as they spin down to the ground.
Have a race with a friend - whose lands first? Whose spins the most? Whose spins the slowest?
Experiment with making long ones and small ones - what is the difference between them?
Try using card, and different weight paper.
Experiment with different shaped flaps.
Have fun!
Cardboard Spinners
I made these spinners as a child at school in the UK. We used card cut into a circle shape, but this time I recycled empty ribbon spools and used the card from the empty spool (that's why there is a large circle cut out of the middle). Paper plates also work well. Punch two holes in either side and thread string through. You can either cut one very long length of string and thread it through all holes before tying into a knot, or you could cut two smaller lengths and thread it through each side and tie it off, as in the picture above. Experiment with drawing or colouring patterns on one side - eg spirals.When I was at school, we drew a bird on one side and a cage on the other.
Twist and twist and twist before holding the string taut and watch as the disk spins around and around.
Things that turn, spin, and rotate.
I wanted to make a "Spinning Wall Hanging" - namely a collection of materials hanging up that could be spun. I gathered a variety of resources that were round, with holes in the middle for threading. Some of the above lids did not have holes in before I found them, but they were easy enough to pierce using a craft knife..We used lids, old CD's, empty ribbon spools, and empty cotton reels. The children threaded them through and I hung them up on a bamboo cane hanging from the ceiling. The items are attached together, so if you spin the lower items, the items up above it also spin around. Children decorated the items, drawing on patterns and colouring them, which gives added effects when they are spinning around.


